raspberry pi – external sound card sucess

Installed a Griffin iMic USB sound card on Raspberry Pi today.

Here’s how:

  • plug in imic
  • Edit alsa  config file so that imic is default sound cart
  • test

Details

For editing alsa, follow instructions at beginning of this post for editing /etc/modprobe.d/alsa-base.conf 

But you can stop following the instructions after the first reboot.

http://www.jackenhack.com/raspberry-pi-usb-audio-quality-problems/

For testing, use this command:

sudo aplay /usr/share/sounds/alsa/Front_Center.wav


Arduino pachube (cosm) feed for musical stairs

(update) the feed is working – I changed the datastream name from sensor_value to count – and just had it upload a random value every time for testing.

Some initial testing with the Ethernet shield encountered missing libraries when compiling the example sketch which cosm.com provides when setting up an Arduino type feed.

Here is the forum post which explains which libraries are missing:  http://community.cosm.com/node/1694

and here is the helpful quote…

You should try using new official Cosm library for Arduino.

You can download a snapshot zip file here:
https://github.com/cosm/cosm-arduino/zipball/master

You will also need this HTTP library:
https://github.com/amcewen/HttpClient/zipball/master

See here for more details on how to install a 3rd-party
library on different OS:
http://arduino.cc/en/Guide/Libraries

You will find a bunch of usefull examples within the
Cosm library. Please let me know if you have any questions.

MIDI wireless options

A thought exercise – to come up with various ways of making wireless Midi systems based on projects I’ve already done.

  • any combination of iOS and MacOS devices
  • use touchOSC with above setup
  • Arduino + ethernet shield to wifi router to touchOSC
  • Same as above but using wifi bridge to connect to router*
  • Arduino + wifi shield via UDP*
  • Arduino + wireless SD + xbee to same – one end connected to mac OS device
  • IR emitter/detector pair*
  • Arduino + wireless SD + WiFly rn-xv via UDP*
  • bluetooth* (here’s an app called bluemidi http://www.iosmusician.com/category/bluetooth-midi-on-ios
  • modulated laser pointer and solar panel*
  • convert to audio then use any audio transmission method and convert back to midi*
  • Use RTTY with ham radio*
  • cell phone*

* indicates method not tried yet.


Google oauth 2.0 authorization for devices

What this means: You create an app on a device which doesn’t have a browser. For example, an Arduino, an appliance, or a game console. This procedure shows how to authorize that device to access a user’s account for Google, Twitter, Facebook, etc.,

See this URL for Google instructions: https://developers.google.com/accounts/docs/OAuth2ForDevices

Notes and Google examples (using curl from a command line):

Here is an oauth 2.0 google request for a user code – The client id is obtained using instructions found at the link above.

curl -d "client_id=104588205543369.apps.googleusercontent.com&scope=https://www.googleapis.com/auth/userinfo.email  https://www.googleapis.com/auth/userinfo.profile" https://accounts.google.com/o/oauth2/device/code

Which returned this JSON response:

{
  "device_code" : "4/Gujc7GxpGFSHNlphxVZCK_y10yS6Kq",
  "user_code" : "ibaz70ej9",
  "verification_url" : "http://www.google.com/device",
  "expires_in" : 1800,
  "interval" : 5
}

Then you go to the URL in the response, enter the user code, and follow instructions…

Then from the device you do this…

curl -d "client_id=1045882053369.apps.googleusercontent.com&client_secret=zDP5UVwbqcYzv7rnVieKxnOV&code=4/Gujc7GxpGHNlphxVZCK_y10yS6Kq&grant_type=http://oauth.net/grant_type/device/1.0" https://accounts.google.com/o/oauth2/token

Which returns this response:

{
  "access_token" : "ya29.AHES6ZE2QxqzZyWkGu20lJljEIHYTf08VtggyRF73428w0LQ7lzFP_uw",
  "token_type" : "Bearer",
  "expires_in" : 3600,
  "id_token" : "eyJhbGciOiJSUzI1NiIsImtpZCI6ImJhZGQ4NWFhMmRlZmZkMWFkZWJkNzc2NTgxNWMzZmVjZTM0MmIzNGEifQ.eyJpc3MiOiJhY2NvdW50cy5nb29nbGUuY29tIiwiaWQiOiIxMTExNzg0MjgyNzI3MDgxMTI0NTMiLCJhdWQiOiIxMDQ1ODgyMDUzMzY5LmFwcHMuZ2df9vZ2xldXNlcmNvbnRlbnQuY29tIiwiY2lkIjoiMTA0NTg4MjA1MzM2OS5hcHBzLmdvb2dsZXVzZXJjb250ZW50LmNvbSIsInZlcmlmaWVkX2VtYWlsIjoidHJ1ZSIsInRva2VuX2hhc2gefiOiJvVG9OdS0tYU1DUGhYbUI1S3p4TTN3IiwiZW1haWwiOiJ6aWNhcmVsdEBnb3VsZGFjYWRlbXkub3JnIiwiaGQiOiJnb3VsZGFjYWRlbXkub3JnIiwiaWF0IjoxMzU2MjQ2Mjg2LCJleHAiOjEzNTYyNTAxODZ9.DqIqLtg9m6wlHh5YSFFgXIOgbMW0E2mKR2FdY7PWtNJrt91moqVBe7dQxQPNalQMKhYTapJdVk2MB1oRl7zXEnLIe_VjI3BUwzTKqaG_sS9oRyh14_yqDWeMFru5d7OFUm1Ulwb2lLdWWwtttEVyJiw94oBdR0tuWg0MNkEOkXU",
  "refresh_token" : "1/NuEmigydABgeRwZaRCZbZZckJ-EJFZd8C1YZLURut8s"
}

Now your device can use the access token query string method…

curl https://www.googleapis.com/oauth2/v1/userinfo?access_token=ya29.AHES6ZQxqzZyWkGu20lJljEIHYTf08VtggyRF73428w0LQ7lzFP_uw

Here is the response:

{
 "id": "1111784282727081812453",
 "email": "[email protected]",
 "verified_email": true,
 "name": "Tony Tiger",
 "given_name": "Tony",
 "family_name": "Tiger",
 "hd": "looney.org"
}

Or you can use the http header option…

curl -H "Authorization: Bearer ya29.AHKKES6ZQxqzZyWkGu20lJljEIHYTf08VtggyRF73428w0LQ7lzFP_uw" https://www.googleapis.com/oauth2/v1/user info

which should return the exact same response.

[Also see] tkzic/max teaching examples/google-oauth2.0-readme.txt


Conversation with a robot in Max

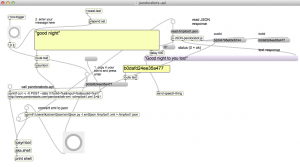
This project brings together several examples of API programming with Max. The pandorabots.api patch contains an example of using curl to generate an XML response file, then converts XML to JSON using a Python script. The resulting JSON file is read into Max and parsed using the [js] object.

Here is an audio recording of my conversation (using Max) with a text chatbot named ‘Chomsky’

‘Chomsky’ lives at http://pandorabots.com.

My voice gets recorded by Max then converted to text by the Google speech-api.

The text is passed to the Pandorabots API. The chatbot response gets spoken by the aka.speech external which uses the Mac OS built-in text-to-speech system.

Note: The above recording was processed with a ‘silence truncate’ effect because there were  3-5 second delays between responses. In realtime it has the feel of the Houston/Apollo dialogs.

pandorabots-api.maxpat (which handles chatbot responses) gets text input from speech-to-google-text-api2.maxpat – a patch that converts speech to text using the Google speech-API.

https://reactivemusic.net/?p=4690

The output (responses from chatbot) get sent to twitter-search-to-speech2.maxpat which “speaks” using the Mac OS  text-to-speech program using the aka.speech external.

files

Max

  • speech-to-google-text-api2.maxpat
  • JSON-google-speech.js
  • pandorabots-api.maxpat
  • JSON-pandorabot.js
  • text-to-speech2.maxpat

externals:

[authorization]

  • none required

external programs:

  • sox: sox audio conversion program must be in the computer’s executable file path, ie., /usr/bin – or you can rewrite the [sprintf] input to [aka.shell] with the actual path. Get sox from: http://sox.sourceforge.net
  • xml2json (python) in tkzic/internetsensors/: xml2json/xml2json.py and xml2json/setup.py (for translating XML to JSON) – [NOTE] you will need to change the path in the [sprintf] object in pandorabots.api to point to the folder containing this python script.

instructions

  • Open the three Max patches.
    • speech-to-google-text-api2.maxpat
    • pandorabots-api.maxpat
    • text-to-speech2.maxpat
  • Clear the custid in the pandorabots-api patch
  • Start audio in the Google speech patch. Then toggle the mic button and say something.
  • After the first response, go to the pandorabots-api patch and click the new custid – so that the chatbot retains the thread of the conversation.

download:

The files for this project can be downloaded from the intenet-sensors archive at github

https://github.com/tkzic/internet-sensors

Pandorabots API

Update: Now part of Internet Sensors project: https://reactivemusic.net/?p=9834  

original post

Looking into using an API to communicate with chatbots

Here is info from pandorabots FAQ: http://www.pandorabots.com/botmaster/en/~15580d493a63acc7fab1820f~/faq

Chomsky bot id: botid=b0dafd24ee35a477

H.2 Is there an API allowing other programs to talk to a Pandorabot?

Pandorabots has an API called XML-RPC that you can use to connect third-party software to our server. The XML-RPC has been used to connect Pandorabots to a wide variety of third-party applications, including Mified, mIRC, Second Life and Flash.

You may interact with Pandorabots as a webservice. Pandorabots offers consulting services supporting arbitrary web services for premium services customers. Please contact [email protected] for more information.

A client can interact with a Pandorabot by POST’ing to:

http://www.pandorabots.com/pandora/talk-xml

The form variables the client needs to POST are:

  • botid – see H.1 above.
  • input – what you want said to the bot.
  • custid – an ID to track the conversation with a particular customer. This variable is optional. If you don’t send a value Pandorabots will return a custid attribute value in the <result> element of the returned XML. Use this in subsequent POST’s to continue a conversation.

This will give a text/xml response. For example:

<result status="0" botid="c49b63239e34d1d5" custid="d2228e2eee12d255">
  <input>hello</input>
  <that>Hi there!</that>
</result>

The <input> and <that> elements are named after the corresponding AIML elements for bot input and last response. If there is an error,status will be non-zero and there will be a human readable <message> element included describing the error. For example:

<result status="1" custid="d2228e2eee12d255">
  <input>hello</input>
  <message>Missing botid</message>
</result>

Note that the values POST’d need to be form-urlencoded.

[update}

Here are two examples I just got to work using curl

curl -X POST  --data "botid=b0dafd24ee35a477&input=hello" http://www.pandorabots.com/pandora/talk-xml

curl -X POST  --data "botid=b0dafd24ee35a477&input=Where are you?" http://www.pandorabots.com/pandora/talk-xml
Here is the result for the second question
<result status="0" botid="b0dafd24ee35a477" custid="b3422b612633ac87"><input>Where are you?</input><that>I am in the computer at Pandorabots.com.</that></result>

Speech to text in Max

Using the Google speech API

(updated locally 1/21/2024 – changed binary path to sox for homebrew /opt/homebrew/bin/sox in [p call-google-speech]

Also changed some of the UI and logic for manual writing and sending.

(updated 1/21/2021)

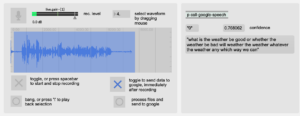
This project demonstrates the Google speech-API. It records speech in Max, process it using the Google API, and displays the result in a Max [message] object.

download

https://github.com/tkzic/internet-sensors

folder: google-speech

files

main patch
  • speech-to-google-text-api6.maxpat
abstractions and other files
  • JSON-google-speech.js (parses JSON response from Google API)
  • ms-counter.maxpat (manages audio recording buffer)

external Max objects

external programs

sox: sox audio conversion program must be in the computer’s executable file path, ie., /usr/bin – or you can rewrite the [sprintf] input to [aka.shell] with the actual path. In our case we installed sox using Macports. The executable path is /opt/local/bin/sox – which is built into a message object in the subpatcher [call-google-speech]

get sox from: http://sox.sourceforge.net

note: this conversion may not be necessary with recent updates to Max and the Google speech API

authorization

  • none required – so far
This may be changing.
Insert here: how to get a speech-api key from Google 

instructions

  • Open Max patch: speech-to-google-text-api6
  • Turn on audio
  • Press the spacebar. Start talking. Press the spacebar again when you are finished. The translation will begin automatically

Note: If you have a slow internet connection you may need to tweak the various delay times in  the [call google-speech] sub patch.

send Tweets using speech

Max [send] and [receive] objects pass data from this project to other projects that send Tweets from Max. Just run the patches at the same time.

Also, check out how this project is integrated into the Pandorabots chatbot API project

https://reactivemusic.net/?p=9834

Or anything else. The Google translation is amazingly accurate.

revision history

  • 4/24/2016: need to have explicit path to sox, in the call-google-speech subpatch. In my Macports version the path is /usr/local/opt/bin/sox.
  • 5/11/2014: The newest version requires Max 6.1.7 (for JSON parsing). Also have updated to Google Speech API v2.
  • update 3/26/2014 to use auto-record features developed for chatbot conversations

Arduino with touchOSC and Max

Bi-directional communication from touchOSC to Arduino using an ethernet shield.
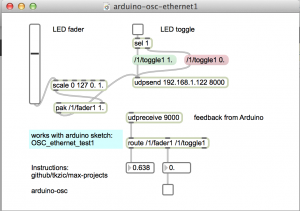
In this version, the Macbook is directly connected to the Arduino to provide a serial monitor for status updates. 

How it works: press a toggle, or move a fader, in touchOSC – it sends a message to the Arduino which lights up, or fades, an LED – then sends back an OSC message to touchOSC to light up the toggle button. (note: local feedback should be off for the toggle button in touchOSC. This is the default)

Arduino circuit
  • Use an ethernet shield. 
  • Connect ethernet cable. (I am using a Netgear WNCE2001 ethernet to wiFi adapter)
  • LED is connected to pin 5 and ground. The shorter lead connects to ground.

download

https://github.com/tkzic/max-projects

folder: arduino-osc

files
  • Arduino sketch: OSC_ethernet_test1/
  • touchOSC screen: simple (default) uses /1/fader1 and /1/toggle1
  • Max patch: arduino-osc-ethernet1.maxpat
Arduino files and libraries

***update 1/20/2016 there is a new sketch that uses the OSCuino library from CNMAT instead of ardosc. The sketches should be interchangeable. https://github.com/CNMAT/OSC . The sketch is in a folder called: OSCuino_tz and is based on work by Trippylightning at: http://trippylighting.com/teensy-arduino-ect/touchosc-and-arduino-oscuino/

Copy the OSC_ethernet_test1/ folder to Documents/Arduino. This puts it in the Arduino sketchbook.

The sketch uses: #include <ArdOSC.h>

Download ArdOSC from: https://github.com/recotana/ArdOSC

  1. After downloading, copy the ArdOSC-master folder to /Documents/Arduino/Libraries
  2. Rename the folder to ArdOSC

This post was the key to figuring out how to make this work: http://arduino.cc/forum/index.php?topic=137549.0

Instructions
  1. Connect Arduino to Macbook via USB.
  2. Open the Arduino serial monitor to initialize the ethernet connection and display the IP address.
touchOSC
  1. In touchOSC or Max, set the target IP to the one just displayed in the Arduino serial monitor
  2. From touchOSC (or Max) send on port 8000, receive on port 9000.
  3. Use the default touchOSC layout (simple)
  4. Use /fader1 and /toggle1 to control the LED
Max
  1. Open arduino-osc-ethernet1.maxpat
  2. Set ip address in [udpsend] to the one just displayed in the Arduino serial monitor
  3. Have some fun
Fixed IP address

update 1/2016: A version of the Arduino sketch that uses a fixed IP instead of DHCP is located in the folder: OSC_ethernet_fixedIP/

The IP is set to 192.168.1.177 but you can change it to any valid address on your network.

Arduino sketch
// generic Arduino OSC program 
// works from Max or touchOSC
//
// plug LED into pin 5 (and gnd)
//
// requires ethernet shield
//
// use serial monitor to get the ip address
//
// use these OSC commands (will work from first page of touchOSC simple layout
//
// /1/fader1
// /1/toggle1
//
#include <SPI.h>
#include <Ethernet.h>
#include <ArdOSC.h>

byte mac[] = { 0x90, 0xA2, 0xDA, 0x0D, 0x0B, 0xCE }; //physical mac address
OSCServer server;
OSCClient client;
int serverPort = 8000; //Touch OSC Port (outgoing)
int destPort = 9000; //Touch OSC Port (incoming)
int ledPin = 5; 
int flag=0;
void setup(){
pinMode(2, OUTPUT);
 Serial.begin(9600); 
 Serial.println("DNS and DHCP-based OSC server");
 // start the Ethernet connection:
 if (Ethernet.begin(mac) == 0) {
 Serial.println("Failed to configure Ethernet using DHCP");
 // no point in carrying on, so do nothing forevermore:
 while(true);
 }
 // print your local IP address:
 Serial.print("Arduino IP address: ");
 for (byte thisByte = 0; thisByte < 4; thisByte++) {
 // print the value of each byte of the IP address:
 Serial.print(Ethernet.localIP()[thisByte], DEC);
 Serial.print("."); 
 }
 Serial.println();
 Serial.println();
//start the OSCserver
 server.begin(serverPort);
//add OSC callback function. One function is needed for every TouchOSC interface element that is to send/receive OSC commands.
 server.addCallback("/1/toggle1", &funcOnOff);
 server.addCallback("/1/fader1", &funcFader);
}
void loop(){
if(server.aviableCheck()>0){
 // Serial.println("alive! ");
 } 
}
//When the button on the TouchOSC inteface is pressed, a message is sent from the iDevice
//to the Arduino to switch (togle) the LED on the Arduino on/off
//then a messeage is sent bak from the Arduino to the iDevice to toggle the buttom on/off
void funcOnOff(OSCMessage *_mes){
 float value = _mes->getArgFloat(0); //TouchOSC expects float values
//create new osc message
 OSCMessage newMes;
//set destination ip address & port no
 newMes.setAddress(_mes->getIpAddress(),destPort);
 newMes.beginMessage("/1/toggle1");
Serial.println(value);
 if(value < 1.0) {
 digitalWrite(ledPin, LOW);
 }
 else{
 digitalWrite(ledPin, HIGH);
 }
newMes.addArgFloat(value);
//send osc message
 //
 // turn local feedback off on touch-osc control to test this
 client.send(&newMes);
}
// new callback for fader - using same comments
//When the button on the TouchOSC inteface is pressed, a message is sent from the iDevice
//to the Arduino to switch (togle) the LED on the Arduino on/off
//then a messeage is sent bak from the Arduino to the iDevice to toggle the buttom on/off
void funcFader(OSCMessage *_mes){
 float value = _mes->getArgFloat(0); //TouchOSC expects float values
//create new osc message
 OSCMessage newMes;
//set destination ip address & port no
 newMes.setAddress(_mes->getIpAddress(),destPort);
 newMes.beginMessage("/1/fader1");
Serial.println(value);
 int ledValue = value * 255.0;
 analogWrite(ledPin, ledValue);
newMes.addArgFloat(value);
//send osc message
 //
 // turn local feedback off on touch-osc control to test this
 client.send(&newMes);

}