The Max remote receiver project described in an earlier post: https://reactivemusic.net/?p=20965 now includes support for OpenWebRx and KiwiSDR sites.
When using OpenWebRx, you need to select a “profile” that supports the receive frequency range, before you can operate within that frequency. Its an unusual system that uses an offset frequency within the selected profile, instead of a global “actual frequency” like the other platforms.
The KiwiSDR sites, in general, have very good quality reception and audio.
The next step in this project will be to consolidate a directory of sites that are useful for remote reception in the ham bands for various parts of the world.
This Max patch connects to a radio transceiver and reads the frequency data using hamlib. Hamlib provides a common API for amateur radio devices. https://hamlib.github.io/. The hamllib server runs in the background using TCP/IP. This patch uses Jeremy Bernstein’s shell object. https://github.com/jeremybernstein/shell and the Sadam Library of externals, installed with the Max package manager.
Files
hamlibtcptest1.maxpat : select radio, starts rigcltd dameon, poll frequency via tcp/ip
launch-rigctld.sh : shell script to run rigctld
Libraries
Max: Jeremy Bernstein’s shell external, and the sadam library from Max package manager.
hamlib can be installed using homebrew
Notes
There is some latency when using the Elecraft K4. Need to look into the internal CAT settings.
Also, look into communication latency of TCP/IP and associated libraries.
I’m exploring a version of this that uses node.js instead of the shell external and tcp/ip library in Max. Initial problem is that the rigctld daemon stays active after Max is closed and needs to get killed manually.
Using an Arduino Uno to detect the transmit state of a radio. The amplifier keying line (PTT) is grounded on transmit. The Arduino sees it as a switch being pulled low. The keying line is connected to digital input 2 (D2) and ground. The digital input uses the builtin pullup resistor. The sketch is the Arduino digital | input pullup example. Max polls the serial data from the Arduino and displays the state of the keying line.
Files
arduino-ptt-detect2.maxpat – reads serial data from Arduino and converts to on/off state. The patch is nearly identical to the Arduino serial read example in the max-projects github.
ampkey2test2.ino – this sketch is almost identical to the Arduino Example | digital | input pullup – sketch. Except the baud rate is set to 38400.
Note: files are not yet available. Local files in max teaching examples.
Remote receiver project using Websdr as a remote alternative to a local receiver.
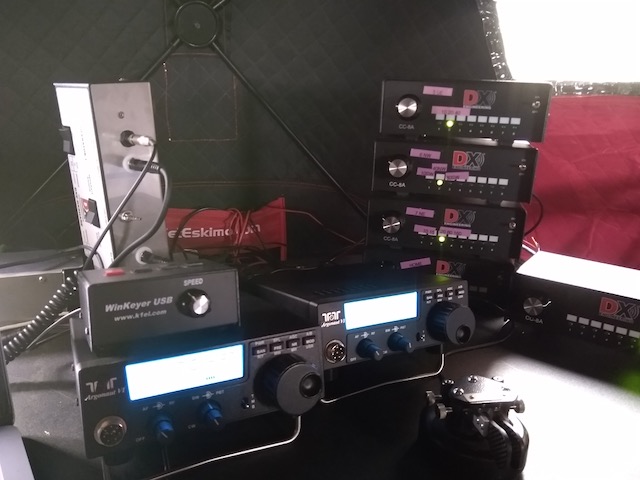
Demonstration of a Max/MSP program that connects an amateur radio transceiver to Websdr – transmitting locally from Maine (USA) while receiving remotely using a radio in the Netherlands. The Max program reads the frequency from a Elecraft K4 transceiver, to control the Websdr sites. It also loads the remote receivers, controls audio routing, mode, filter, and waterfall display settings. An iPad, running touchOSC, acts a a control panel. Up to 4 remote receivers operate at the same time. Websdr is a remarkable system, developed by PA3FWM at http://websdr.org/. It lets you control remote receivers worldwide, from your Web browser.
Components:
Max/MSP
Websdr
TouchOSC
Elecraft K4 transceiver with antenna system
Skookumlogger (logging software)
Max Patches:
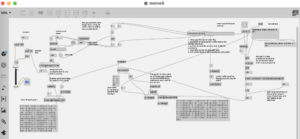
websdrjweb7.maxpat : main control program. Contains [jweb] objects for launching websdr instances. Also code for injecting javascript to control parameters like frequency, filter, and volume. This patch acts as an intermediary between TouchOSC, WebSDR, and allows external MIDI control as well as getting frequency input from CAT controlled radios like the Elecraft K4.
websdrCATaudio.maxpat : handles serial port interaction for the K4. Also reads audio stream from either the K4 receiver (via USB) or the websdr receiver (via Blackhole.) I created an aggregate audio device called K4sdr to allow Max to read both devices at the same time. Audio switching and levels are handled using a Korg nanoControl2. For example to switch between the audio streams or listen to both.
Optional: arduino-ptt-detect2.maxpat : reads serial data from an Arduino, connected to the amplifier keying line, to determine whether the radio is in transmit mode, so we can switch back to the local audio stream to eliminate latency of hearing your signal via websdr. See subsequent post about this setup…
TouchOSC
websdrCW3.touchOSC : controls all 4 websdr channels, ie,., volume, mute, filter, CW offset, filtershift, – Also handles window management, loading js code, zoom in/out websdr and selecting channel waterfall views or Max code views.
CW Offset
websdr doesn’t have a control for CW pitch offset. To sync the frequency of the K4, the websdr is run in LSB mode with a frequency offset equal to the CW pitch setting in the transceiver. eg., 450 Hz. This works for most of the websdr sites, but unfortunately some of the sdr’s are off-frequency. You can usually compensate by adjusting the CWfreqOffset for that channel (in Max or TouchOSC).
Setting the offset also requires shifting the filter so it is centered over the actual signal.
Files
This is currently a work in progress, not available on Github. Local files are in max teaching examples folder.
Mapping geocoded contest log data using node.js and openlayers.
The goal was to make something that looks like the Reverse Beacon Network map, only for contest log files. I use RBN for testing antennas now. That map display gives you a pretty good idea of your actual antenna pattern.
Code is written in node.js (javascript) and html.
Part 1: Read a Cabrillo log file containing QSO: records. Look up each callsign, get latitude and longitude, and rewrite the file as json data, tagged with geo coordinates. I originally tried getting the data from hamQTH but it was not current, so ended up using the qrz.com xml callsign lookup. For callsigns “not found” I used the qrz.com dxcc prefix lookup to get general coordinates for the country. There are still a few bad/missing data issues to resolve. Like European stations with coordinates at the South Pole.
Part 2: Tried various mapping frameworks – like leaflet, arcgis, and openlayers. Wanted to use a great-circle projection (azimuthal equidistant) like the big ARRL world map. And may still figure this out. But working with map projections and coordinate transforms is way worse than doing a Smith Chart. I ended up hacking a flight tracking example from openlayers.org and basically replacing airplanes with QSO’s. That is why the lines are animated from source to destination. Also added a layer for day/night, and QSO/time status display.
It probably makes sense to get rid of the flight animation and just display the entire path in sync with the QSO data – with color code for each band (K1KP) – and speed control on the time lapse, etc., So you can get a better sense of rate and propagation.
It would be cool to have a website where you could upload a log file and generate maps.
Note: this project is not yet available
Files
local files:
generating data:
internetsensors/cabrillomap
put the cabrillo data in testdata.cbr (use QSO: records only for now) should be sorted chronologically.
run: node index.js
the output file will be: geocab.json (which is used as input to the mapping program)
mapping
internetsensors/oltest
main.js = node source with ol mapping and data processing
index.html = web page for map
geocab.json = geocoded cabrillo json test data
to run, type: npm start
Then open: http://localhost:5173/ in a browser
Additional work / current issues
Some of the qrz.com callsign data has bad geo coordinates. In particular some of the records show a latitude of -89 and longitute -179 – need to check for these numbers and replace with dxcc coordinates.
There should be an argument on the node program to pass in the datafile. Also the program should clean up any non QSO: records, like the file header info and any X-QSO recs.
Also need to clean up the async/await stuff – currently there are several methods for handling state transitions.
mapping ideas:
As mentioned above, its probably a good idea to make a version of the code without the flight animation, and have various controls to stop/start the data playback to look at individual qso’s do speed control, etc.,
azimuthal equidistant projection: there are some links to examples in leaflet, and arcgis to handle complex projections. In documents, look at: “map links for projection stuff.txt”
leaflet test version:
in the internetsensors/cabrillomap folder there’s a test file: cbworld1.html that works using websockets when you run the index.js file to generate test data. It uses a leaflet map, but the lines don’t adapt to great circle polar paths.
arcgis
I believe the arcgis examples are in internetsensors/projected geometries
And: internetsensors/pe-gs-projection
The former is a a very nice world projection with some point markers. The latter is an example that shows how to switch out various projections in realtime.
Using 40 meter SSB, Max/MSP, and Websdr to build a feedback delay from Maine to the Netherlands.
A Max patch plays an audio file into the transmitter in Maine. Then, using a websdr receiver in the Netherlands, the received signal is amplified and mixed back into the audio to be retransmitted. Effectively creating a feedback delay line.
Here is an example of what it sounds like on 40 meters.
The audio from Websdr is routed to the input of Max by creating a multi-output device (In Audio Midi Setup) combining “Blackhole 2ch” and external headphone output (for monitoring). The audio output of Max is assigned to the transmitter SSB input.
Patch not yet available. Local version is in max teaching examples.
I needed a text to morse code generator in Max for the Twitter streaming map project. There was an ancient one that used [mxj] but its kind of a pain to use that object. I thought it can’t be that difficult to write one? I didn’t really have any idea where to start. Something about the blank Max patch causes brain activity? I went through about 5 different approaches. Eventually came up with this pattern thing, from thinking about the lighted buttons on the tr-808 drum machine.
For example, the letter A is . _ (dot dash)
morse code has rules for spacing:
dot = 1
space between tones = 1
dash = 3
space between letters = 3
space between words = 7
If you think of a drum machine pattern, the pattern for letter A would be: 1 0 1 1 1 0 0 0 (with the 3 trailing 0’s for letter spacing)
I made a [coll] with all the letter patterns indexed by ascii codes.
Then just concatenate letter patterns, for a given block of text, together into one big list and run it through [zl.nth] clocked by a [metro] and [counter]. the ones and zero’s turn an oscillator on and off.
local file: tkzic/internetsensors/twitter-stream2/morse5.maxpat
But it won’t run from that server. It only runs locally.
Instructions
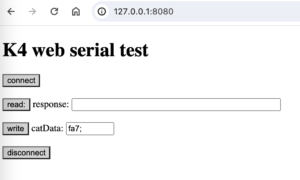
Download the index.html file from the link above. start a local web server, eg., “npx http-server” and enter the server address into a Chrome browser.
When you press connect, the browser will prompt you to select a serial port for the radio. On my computer the K4 serial ports appear something like: cu2.usbserial-21100. There are 2 ports. Select either one.
Then press read. If you spin the dial on the K4, and it is autoinfo mode, you should see CAT commands in the read window.
enter a CAT command in the write window and press the write button. It is preloaded with “fa7;” which sets frequency to 7 MHz.
I was unable to find any apps to create virtual serial ports for later versions of Mac OSx eg., Catalina.
There is a partial solution using the linux socat utility. It will create functioning vsp’s but the ports will not be detected by most apps, like Max/MSP. I tried setting a symlink to files in /dev using tty. and cu. prefixes. eg., /dev/tty.x1. But apps that look for serial ports still couldn’t detect the vsp’s.
Instructions
download and install socat using macports or brew. eg., “sudo port install socat”
Disable SIP (system integrity protection). In Catalina, reboot holding cmd+r. Then type: “csrutil disable” into a terminal window. Reboot – Note: you probably don’t need to do this if you aren’t setting up a link in /dev – which so far doesn’t work anyway