Building SoapySDR and CubicSDR with Linux

How to build SoapySDR and CubicSDR from source in Ubuntu 20.04

After unsuccessful attempts to compile SoapySDR and CubicSDR on Mac OS and Windows, I was able to get it running in Ubuntu 20.04.  The whole process took about 2 hours but could be done in less time if you know what you are doing.

It wasn’t really necessary to install CubicSDR to test SoapySDR. But CubicSDR is the only SoapySDR app that consistently works when it comes to devices, I/Q, files and TCP frequency control.

After completing this install I was also able to compile and run the SoapySDR example code here:  https://github.com/pothosware/SoapySDR/wiki/Cpp_API_Example

Build

There are excellent instructions at the CubicSDR wiki on github: https://github.com/cjcliffe/CubicSDR/wiki/Build-Linux

I also added the rtlsdr driver and the airspyhf driver. Instructions for rtlsdr are on the wiki. Instructions for airspyhf are below. You can add these drivers/libraries at any time, after SoapySDR is installed.

There were several missing libraries – described here.

hamlib

Hamlib is an option in CubicSDR. It was included because we’re using it to send frequency data to the devices via rigctld. You’ll need to install hamlib before you try to compile CubicSDR

Instructions and source code here: https://github.com/Hamlib/Hamlib

Instructions are somewhat vague. Here’s what I did.

Install libtool:

sudo apt install libtool

Clone the repository, build, and install:

git clone https://github.com/Hamlib/Hamlib.git
cd Hamlib
./bootstrap
./configure
make
sudo make install

airspyhf

airspyhf library code from Airspy. Instructions here: https://github.com/airspy/airspyhf

This is what I did, if I can remember correctly. You may need to install libusb, but if you have done all the stuff above you probably already have it.

git clone https://github.com/airspy/airspyhf
cd airspyhf
mkdir build
cd build
cmake ../ -DINSTALL_UDEV_RULES=ON<
make
sudo make install
sudo ldconfig

SoapyAirspyHF

Now you can add the Soapy AirspyHF drivers. Instructions here:  https://github.com/pothosware/SoapyAirspyHF/wiki

git clone https://github.com/pothosware/SoapyAirspyHF.git
cd SoapyAirspyHF
mkdir build
cd build
cmake ..
make
sudo make install


Max8radio CubicSDR I/Q prototype

Another working prototype with Max and CubicSDR

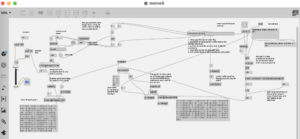
Now working some better… The Max SDR patch is receiving an IQ audio stream at 96 KHz from CubicSDR and sending frequency data to rigctld daemon via a python script that recodes OSC to tcp data.

repository: https://github.com/tkzic/max8radio

Files:

max8sdr1.maxpat

py3rigctl2.py (python script)

Instructions:

Basically the same as instructions in the previous prototype here: https://reactivemusic.net/?p=19995

make sure to start the rigctl daemon before CubicSDR

 rigctld -m 1 4532 & 

And make sure there is some audio gain on CubicSDR

But… There is only one Max patch now and – after you start the rigcltd daemon, you need to run the python script in the max8radio folder like this:

python3 py3rigctl2.py

The most important thing is to start CubicSDR first before you run the Max patch. Make sure to get everything working correctly. Then start the Max SDR.

In CubicSDR make sure you only have one “modem” running – otherwise the IQ data stream will be a complete mess. Als0 make sure that the audio sample rate in CubicSDR is set to 96 KHz. It will revert to 48 KHz. everytime you load the program. You can use the ‘bookmarks’ from a previous CubicSDR session (lower left part of the screen) to load a previous session with the same parameters.

These are the necessary settings:

  • I/Q modem
  • Audio out: Existential Audio Inc. Blackhole 2 ch.
  • Audio sample rate: 96 KHz.
  • Rig Control Menu: enable rig and follow rig should be ‘checked’
  • Frequency should equal Center frequency and the V delta lock toggle should be on
  • Demodulator Gain level should be very low to prevent excess AGC (upper right corner)

Actually if you have loaded everything ok in a previous session, try this:

  • get the rigctld daemon running from the command
  • load CubicSDR
  • First thing: click ‘enable rig’ under rig control (this will probably load some crazy frequency like 145 Mhz
  • Then in the bookmarks (lower left) double click on your previous session, under ‘recents’ for example: 7007MHzI/Q – this should restore almost all the settings.
  • Then change the audio sample rate to 96 KHz if needed.
  • If the input to Max seems wrong, try clicking the S  (over near the top right)  to solo the modems. There may be more than one going.

Max settings

  • Set audio input to Blackhole 2ch @ 96 KHz. (to match output from CubicSDR
  • Click the ‘flip IQ’ toggle – for some reason CubicSDR sends out the I/Q signal flipped
  • The arrow key tuning and all other tuning methods should work now

Notes

One of the problems with CubicSDR is sometimes you’ll accidentally change something and all the settings go crazy.

note: I tried a new version of CubicSDR (2.6) from the sdrplay website. It would not detect any connected devices or audio drivers.

Once you get it working, the audio quality inside Max is excellent – using the Airspy HF+

IOTA

Igloos on the Air

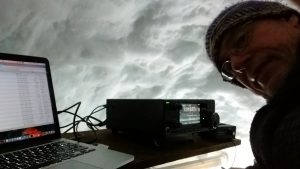
Operating the 2016 ARRL DX CW contest from inside an igloo at the summit of Witt Hill in Norway, Maine.

You can see the dipole feedline entering the air hole near the top right of the igloo – in the above photo.

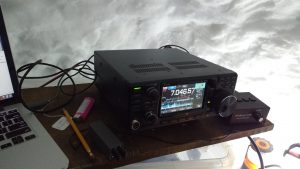
Inside the igloo, the rig is balanced on a board, supported by plastic storage containers. I ran full power, 100 watts, from an IC-7300, using Bioenno LiFePo batteries. The temperature inside stays a few degrees above zero Celsius. I thought the rig would help heat up the igloo, but instead had to rely on wool blankets.

All of the gear was pulled up on sleds using human power.

About 3 feet of snow fell in the week before the contest.

Results: KA1IS – 40 meters SOSB LP claimed score: 86,286 (394 QSO’s + 73 countries)