New version of software define radio for Max/MSP (in progress)
github repository: https://github.com/tkzic/max8radio
Notes
goals and strategy
The new approach will be to remove most of the device handling code from Max. Instead providing device interfaces from existing device libraries, like soapy-sdr, hamlib, gnu-radio, etc., The Max portion of the project will read IQ files, perform DSP, and other magic.
The first platform will be Max8 in Mac OS Catalina
projects
Max + CubicSDR + hamlib
See working prototype below. This setup uses CubicSDR as a device driver to send IQ data into Max’s input audio stream. CubicSDR supports many devices via soapySDR. It supports networked rig control via Hamlib.
Advantages of this system: It works now. It runs in Windows. It runs over the a local network. The software is managed and distributed by somebody else.
Disadvantages: Its not an elegant solution – ie., not self contained within Max. It requires installation and setup of CubicSDr. The software is managed and distributed by somebody else – so it could stop working at any time.
rx_tools + hamlib
rx_tools is an update of some of the rtl tools, like rtl_fm. It includes soapySDR device support. If hamlib is added to rx_tools, then you could do the same networked frequency control, and IQ streaming as CubicSDR – using rigctld. Without the overhead of running CubicSDR. The downside it that it’s yet another program to maintain and distribute.
Next step: look at source code for rx_tools and estimate scope of hamlib intergration.
openwebrx and websdr API
openwebrx https://www.openwebrx.de/
Websdr http://websdr.org/
These sites provide access to SDR devices connected to web servers. Although they don’t stream IQ data, it would be interesting to build a Max front end to the APIS.
background information
See previous posts:
External programs required
- hamlib (macports)
- cubicSDR (see link above)
- netcat (nc) (built into Mac OS terminal)
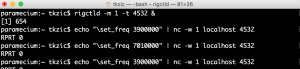
notes on rigctld commands
Best results using one letter commands with single quotes:
echo 'F 7023000' | nc -w 1 localhost 4532
Prepend ‘+’ for more feedback, like this:
% echo '+F 7023000' | nc -w 1 localhost 4532
set_freq: 7023000
RPRT 0
Latest prototypes
Links to latest working projects (from newest to oldest)
First Max test project
This is an update of the test done with CubicSDR and RTLSDR as described here: https://reactivemusic.net/?p=19802
CubicSDR is great but eventually the goal is to pare down the interface between the SDR device and Max. Something like a command line IQ filter would be ideal: https://github.com/xmikos/simplesoapy
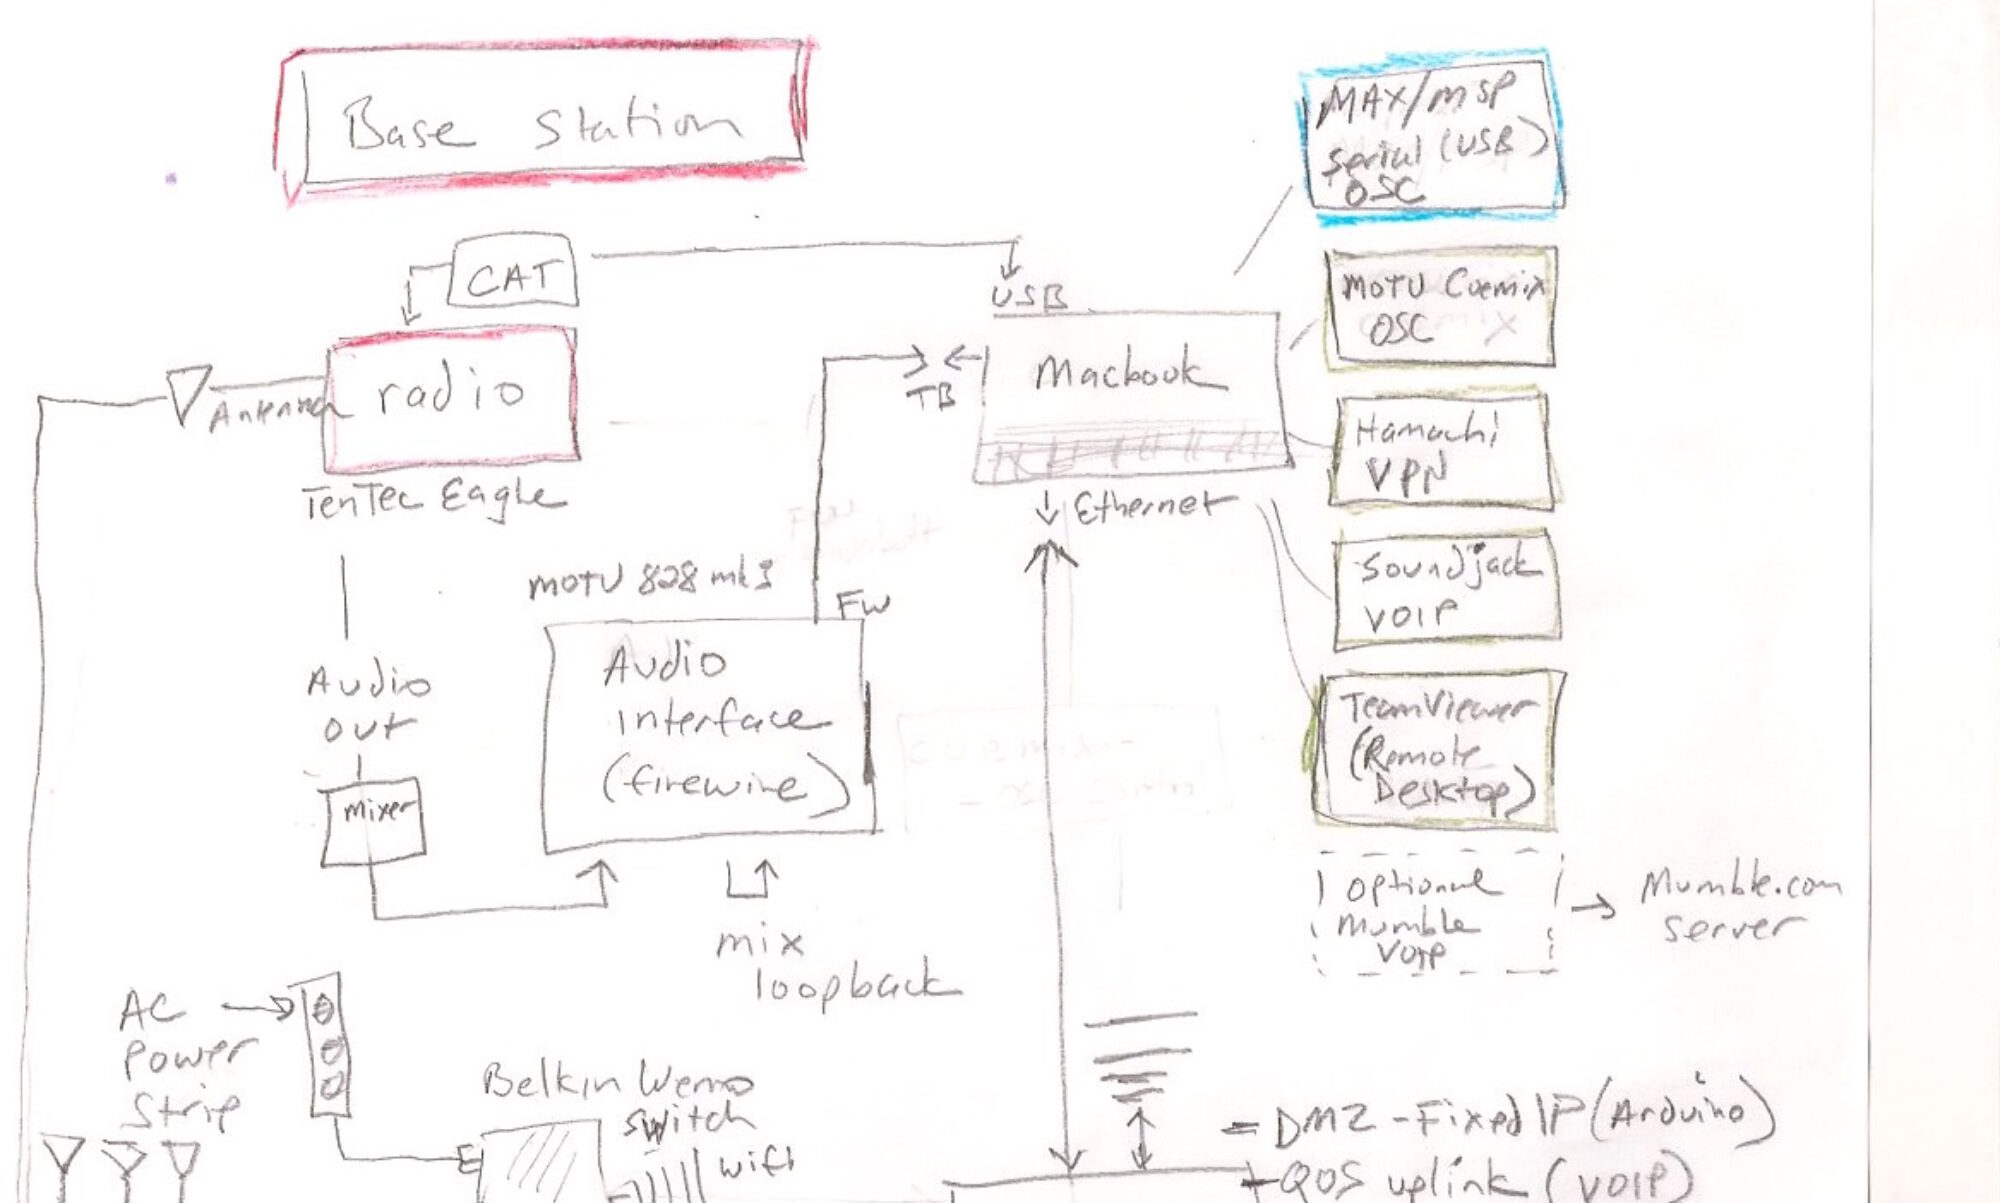
Hardware and system setup
This test uses an Airspy Discovery HF+, but any device supported in CubicSDR should work – that’s the point of this exercise.
Using BlackHole from Existential Audio https://existential.audio/blackhole/
as an alternative to Soundflower to route the IQ (audio stream) data from CubicSDR to Max. You could also use a cable to connect output of one audio device to input of another, etc.,
Signal path:
Antenna -> Airspy -> CubicSDR -> rigctld -> Max
CubicSDR settings
- Plug in Airspy device before launching CubicSDR, so it will be discovered on the setup screen
- On the main display, click just to the right of the mode buttons to bring up a drop down menu of audio devices
- select I/Q mode
- select the audio device, or “BlackHole 2ch”, that you will use to route audio to Max
- click on any of the frequency digits, press space, and enter in the same frequency as the Center Frequency (e.g., 7000000)
- click the ‘V’ to the left of the frequency digits, to select ‘delta lock mode’. This causes the frequency and center frequency to sync.
- Be careful not to click anywhere in the waterfall window – or this will mess up the sync
- Under Rig Control menu:
- Select “Hamlib NET rigctl” as the model
- Enter localhost:4532 as the control port
- Select 57600 as the serial rate
- Make sure that “follow rig” and “floating center” are checked
- After you get the rigctld daemon started, come back here and ‘Check’ ‘enable rig’. If it doesn’t stay checked, then there is a problem with the connection.
- Under the Audio sample rate menu, select the correct sample rate for your audio device (e.g. 96k)
Notes: It seems there is some kind of AGC hardwired into CubicSDR. https://github.com/cjcliffe/CubicSDR/issues/826
TCP and rigctld settings

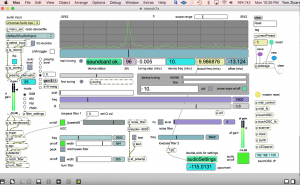
Max settings
For this test, you can use any of the MaxSDR tutorials available at https://github.com/tkzic/max8radio
We’ll be using maxsdr7a.maxpat
ignore the max-console messages about missing externals.
The key is to choose the default audio input device and set it to be the same as what is coming out of CubicSDR. ie., “BlackHole 2ch”
- Set the audio input device to match CubicSDR, as described above. Also match the sample rate (e.g., 96k)
- Set the audio output device to your internal soundcard/speakers
- Start audio and recall preset 1 or some normal settings for SSB
- It should be receiving I/Q data now from Cubic SDR
- Note: may need to flip the I/Q input due to anomaly in CubicSDR.
- Now load another Max patch to do the frequency control: rigctld1.maxpat
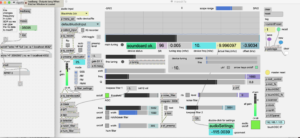
This patch sends frequency data to the rigctld daemon via the [shell] object. You can change the frequency using the number box.
That’s about it for now.