Notes: Chatbots in Conversation

update 6/2014 – Now part of the Internet sensors projects: https://reactivemusic.net/?p=5859

original post

They can talk with each other… sort of.

Last spring I made a project that lets you talk with chatbots using speech recognition and synthesis. https://reactivemusic.net/?p=4710.

Yesterday I managed to get two instances of this program, running on two computers, using two chatbots,  to talk with each other, through the air. Technical issues remain (see below). But there were moments of real interaction.

In the original project, a human pressed button in Max to start and stop recording speech. This has been automated. The program detects and records speech, using audio level sensing. The auto-recording sensor turns on a switch when the level hits a threshold, and turns off after a period of silence. Threshold level and duration of silence can be adjusted by the user.  There is also a feedback gate that shuts off auto-record while the computer is converting speech to text, and ‘speaking’ a reply.

technical issues

  • The Google speech API has difficulty with some of the voices used by the Mac OS speech synthesizer. We’ll need to experiment to find which voices produce accurate results.
  • The overall levels produced by the builtin Macbook speakers is not quite enough to achieve clear communication. The auto-recorder missed the onset of speech sometimes. One solution would be to insert a click to trigger the recorder, just before the speech synthesizer begins the actual speech. Or to use external speakers, or a secondary “wired” connection.
  • It would be nice to have menus of chatbots and voices. Also to automate the start of a new conversation thread.
  • The button to start the audio detector had to be operated by key-press because pushing the trackpad on a MacBook makes too much noise and always triggers the audio level detector.
  • Occasionally a chat bot would deliver a long response, or one containing a web address. These were problematic for recognition and synthesis.

local files

  • tkzic/internetsensors/speech-to-google-text-api3.maxpat
  • tkzic/internetsensors/pandorabots-api2.maxpat
  • tkzic/internetsensors/text-to-speech3.maxpat
 

ep-4yy13 DSP – week 1

Digital Signal Processing, theory and composition

Spring 2014

teacher: Tom Zicarelli – http://tomzicarelli.com

You can reach me at:  [email protected] 

Office hours: Wednesday 2:30-3:30 PM, at the EPD office #401 at 161 Mass Ave. Please email or call ahead.

Assignments and class notes will be posted to this blog: https://reactivemusic.net before or after the class. Search for: ep-4yy13 to find the notes

Examples, software, links, and references demonstrated in class are available for you to use. If there is something missing from the notes,  please ask about it. This is your textbook.

Syllabus:

The focus will be on composition – and sparking your imagination. Composition plus science fiction. After you take the course, you will have composed several new pieces. You might design a musical instrument. You will have opportunities to solve problems.  You will become familiar with how artists use DSP to compose music and to build musical instruments. You will be exposed to to a world of possibilities – which you may embrace or reject.

In particular we will compose, by improvising, using tools that transform signals and movement. For example, generative music.

We will explore a range of topics in DSP, and have opportunities to use them in projects. Most applications of DSP involve one or more of the following actions using signals:

  • analysis
  • measurement
  • transformation

For example, statistics is a form of analysis.

Topics: (subject to change)

  1. Future music tools
  2. Improvisation
  3. Signals: the time domain – granular synthesis
  4. Signals: the frequency domain – convolution
  5. Problem solving, prototyping, portfolios
  6. How to get ideas
  7. Sensors
  8. Demodulation and reversibility
  9. Artists
  10. Voices
  11. Music from data – sonification, Internet API’s
  12. Statistics
  13. Radio waves and ultrasound
  14. Visualization

Grading:

Grades will be based on compositions, several small assignments, and class participation. Please see Dr. B’s EP-4yy13 syllabus for details. I encourage and will give credit for: collaboration with other students, outside projects, performances, independent projects, and anything else that will encourage your growth and success.

Assignment:

Go to the future. Make music. Bring it back to the present.

It should be a very short piece or an excerpt. Less than two minutes. It can be a remix of a song that you believe represents a future direction in music. Near future or distant future – your choice. Use any tools to create the music. The result: an audio file (mp3) or a link to audio or video on the Internet, or a live performance in class

Due: in 2 weeks.

Pluggo fx matrix

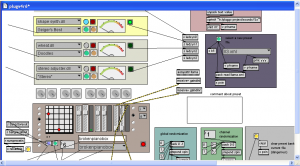
A Max 4.6 patch that uses Pluggo to create random effect matrixes with random parameters and various routing options.

plugv4r6.pat is the patch that works

User guide

(in progress)

download

– not available yet

startup

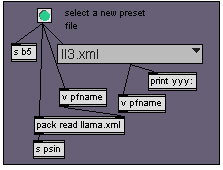
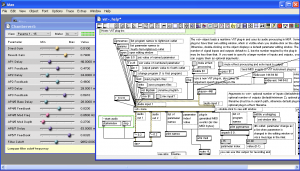
Choose a data file from the menu in this panel

The data files contain patches – not Max patches, but banks of fx patches that define a configuration of fx saved and named by the user. I haven’t figured out just what is what yet. Select a patch and press the green button. If it worked you will see the patch name change in this text box:

If it doesn’t work, the drop down menu in this box will probably read ‘nothing’

To select a patch, use the drop down menu box, or the number box to the left to make a selection. Then press the green reload button just to the left… (the purple button is for saving the current patch)

After pressing the green button – you should see the fx rack modules reloading from top to bottom – they will turn yellow when loading – and you may see the Pluggo control panel appear.

note: you may need to load a patch twice – there is a bug in the sequence of events for reloading parameters

randomization

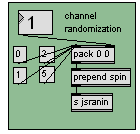
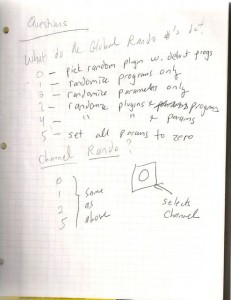
Channel randomization: There are 4 channels 0-3 which correspond to the individual fx in the rack, starting at the top. The number box selects which channel to randomize.

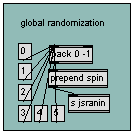
Global randomization: Randomize all channels

There are various randomization modes that you choose with the message boxes:

  • 0: randomly select a new plugin for the channel – using default preset (program)
  • 1: randomly select a new preset (program) for the current plugin
  • 2: randomly select new (reasonable) parameter settings for the current plugin
  • 3: randomize the plugin and the programs
  • 4: randomize the plugin and the parameters 
  • 5: randomize all the parameters for this plugin, reasonable or not. (this appears to not work)

Saving patch files

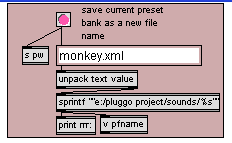
Enter the name of an xml file to save the new bank of patches to, and press the red button.

Note: the patch (xml) files are getting modified by the patch, even when they aren’t explicitly saved. Why is this?

 fx routing

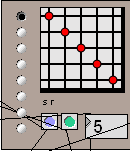
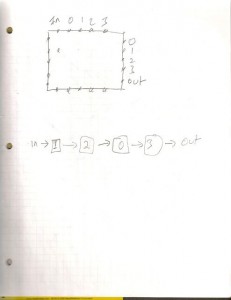
Signals can be routed through the effects matrix in a variety of ways using the matrix control object. The radio buttons on the left side of the matrix control select the most common presets

The vertical lines represent inputs in the following order:

  • signal in
  • channel 0
  • channel 1
  • channel 2
  • channel 3
The horizontal lines represent outputs in the following order:
  • channel 0
  • channel 1
  • channel 2
  • channel 3
  • signal out
A red dot at any intersection makes a connection. Here are the default routings provided by pressing the radio buttons to the left of the matrix.
serial: in -> 0 -> 1 -> 2 -> 3 -> out
reverse serial: in -> 3 -> 2 -> 1 -> 0 -> out
parallel:
in -> 0 -> out
in -> 1 -> out
in -> 2 -> out
in -> 3 -> out
serial + parallel:
in -> 0 -> 1 -> out
in -> 2 -> 3 -> out
Bypass: in -> out
zigzag serial:
in -> 1 -> 2 -> 0 –> 3 -> out
alternate zigzag serial:
in -> 2 -> 3 -> 0 -> 1 -> out
reverse serial + parallel:
in -> 1 -> 0 -> out
in -> 3 -> 2 -> out

Midi plugins and the bypass button

The green indicator to the right of the channel meter indicates that the plugin is a Midi device

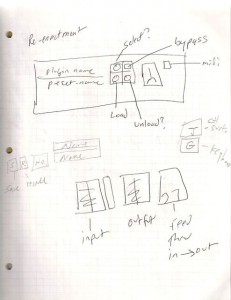
Midi devices receive Midi input and will block audio input in a serial routing. To bypass any plugin, click the red button to the left of the channel meter:

The green button reloads the plugin with the default preset. The brown button does nothing.

Mixer and Midi input

The mixer has 3 sets of stereo controls. From left to right, they are input, wet signal, dry signal. The radio buttons to the right of the sliders allow you to select the current channel – which will bring the plugin control panel for that channel into the foreground.

The 2 drop down menus to the right  of the radio buttons select the midi input devices.

The top menu selects the midi controller device. (bcr-2000)

The bottom menu selects the midi note input and performance device.

The letter assignments can be set in the Max midi-setup configuration.

notes

keyboard shortcuts

global randomization params

IO matrix


Software Defined Radio in Pd

This is based on the Max tutorials. I have only written one external (for Soft66LC2). But everything seems to be working well with minimal filtering. After watching the video, I think the next feature should be an AGC (automatic gain control) on the input stage.

converting IQ audio files using sox

To get information about a file:

# sox --i 10meter96.wav

Input File : '10meter96.wav'
Channels : 2
Sample Rate : 96000
Precision : 16-bit
Duration : 00:00:16.50 = 1584387 samples ~ 1237.8 CDDA sectors
File Size : 6.34M
Bit Rate : 3.07M
Sample Encoding: 16-bit Signed Integer PCM

#

To convert the sample rate:

# sox 10meter96.wav -r 44100 10meter44.wav

More useful hints about sox by Selvaganeshan at “The Geek Stuff”

http://www.thegeekstuff.com/2009/05/sound-exchange-sox-15-examples-to-manipulate-audio-files/

Here are the commands that worked to get the raw IQ data from rtl_sdr into Max

rtl_sdr -f 94900000 -s 1024000 -g 50 iq.raw

To convert the above to 96k 16bit wav format

sox -e unsigned-integer -r 1024k -t raw -b 8 -c 2 iq.raw -r 96k -b 16 iq.wav

Note: I could not get the above conversion to work with device sampling rates below 1024k. Didn’t try anything higher.


return of Pluggo

Pluggo, running in Max 4.6, on a Macbook, inside a VirtualBox instance of Windows XP.

to be continued…

Notes:

update 1/26/2014 – audio input and Max search path

For audio input to work in a windows XP virtual box inside of Mac OS, the sample rate of the microphone in Mac OS (utilities/audio midi setup) must be set to 441000. I spent hours trying to figure this out. Then found this post: https://forums.virtualbox.org/viewtopic.php?f=8&t=56628

The strangest thing is that if you activate audio input in Max without setting the above sample rate, you will get no audio output either.

Also, note that switching default sound cards in the host OS can cause the sample rates to reset back to 96 kHz – requiring them to be reset again before using VirtualBox.

The second issue was that the [vst~] object wasn’t finding names passed with the plug message. Turned out to be a simple matter of setting the path to the plugin directory in the Max file preferences.

Almost forgot – I set a shared drive to be on the E: drive – which was the original location of the plug go project directory – this eliminated need for updates in the patch.

The Pluggo authorization worked.

I was able to use the Behringer UCA202 (audio device) just by plugging it in. Although I couldn’t use any sound cards that required drivers.

http://www.amazon.com/Behringer-Latency-U-Control-UCA202-Interface/dp/B000J0IIEQ

Note: I am running plugv4r6 (the version from 2006)

 original post 

Instructions for installing Windows XP to run max 4.6 in VirtualBox on mac OS 10.8

  • Download and install VirtualBox
  • create new VirtualBox instance (1 Gb of memory)
  • install Windows XP from CD
  • install Firefox (or some reasonable browser)
  • install “guest additions CD image” from device menu select  (inside the virtual machine)
  • install Max 4.6 from c74

For Midi devices:

  • virtual machine – settings -usb – add the midi device – then unplug and replug – windows should find and install
  • also activated windows over internet –
  • installed and tested Pluggo
  • activated drag and drop (doesn’t seem to work)
  • setup shared folders 

Leap air piano in Max

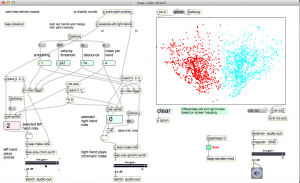
Actually in this context, the word ‘piano’ is way too generous. This is a prototype from October, that uses screen mapping to separate left and right hands. It decodes gestures by looking for high velocity downward hand movements. The gestures are mapped to notes and chords based on X position. There is much de-bouncing and tweaking to get results.

Here’s a demonstration which is somewhat painful to listen to, but gets the point across.

local files:

tkzic/max teaching examples/

  • leap-scale-draw5.maxpat
  • leap-sender.maxpat