http://audiodestrukt.wordpress.com/2013/01/19/installing-pure-data-on-ubuntu/
AMPRNet
FM Midi Synthesizer with Pd on Raspberry Pi
Here’s a simple FM Midi synthesizer developed in pd running on a Raspberry Pi. The patch was written and tested on a Macbook, then the patch file is uploaded to RPi and run using pd-extended from the command line. For example the command to run this patch is:
pd-extended -nogui -noadc -midiindev 1 piSynth1.pd
[todo: upload patch to this site. Currently in tkzic/rpi/pd/piSynth1.pd]
[udpate]: when trying this again, a few problems came up:
- R-Pi didn’t recognize sound card/midi: Solution was to connect the sound card directly to the R-Pi USB port and connect the Midi controller via powered USB hub
- Sometimes pd-extended errors out with a device busy message. Seems to run ok if you press ctrl-c and repeat the pd-extended command line. I think this problem may be due to a previous process hanging – and not exiting cleanly
Pd synth examples
notes
A collection of Pd synth patches that might run on Raspberry Pi.
- simple FM Midi synth from OReilly.com which I’m going to adapt to work with the nano-controller. http://oreilly.com/digitalmedia/2005/04/27/pd.html
- a sampler – which will take forever to figure out but it sounds cool: http://impala.utopia.free.fr/pd/
- controller things from William Brent: http://williambrent.conflations.com/pages/research.html
- From this wiki: http://creaciodigital.upf.edu/wikis/cdsim/index.php/Other_Pure_Data_goodies
bluetooth with Raspberry-Pi
notes
- Using shields… http://www.cooking-hacks.com/index.php/documentation/tutorials/raspberry-pi-bluetooth
- Wifi bluetooth dongle combo http://www.raspberrypi.org/phpBB3/viewtopic.php?f=45&t=27678
- Another article about a nameless dongle http://blog.kugelfish.com/2012/10/look-ma-no-wires-raspberry-pi-bluetooth.html
- Adding a Bluetooth serial terminal to Raspberry Pi http://scruss.com/blog/2012/12/18/adding-a-bluetooth-serial-terminal-to-raspberry-pi/
Raspberry Pi with Pd: audio test
notes
In an audio pass-through test using Pd, with a USB sound card (Griffin iMic), the maximum stereo sample rate before ‘breakup’ is 32000.In mono, it sounds “ok” at 44100. Latency seems low enough to use for music but I’m too sleepy to figure out the numbers.
I don’t know enough about Linux audio to say if the performance deficit is due to ALSA drivers, the sound card, background processes, pd, the CPU, or what?Anyway I ‘m guessing R-Pi will spawn interesting synths and lo-fi FX processors. They’re cheap enough you could use them in parallel.
Prediction: They’ll double the speed, and sell a million more by the end of the year. We’ll see a range of ‘Pi’ clones which run the same Linux distributions, but offer various speeds and IO options. It feels like the democratization of manufacturing has taken another huge leap.
pd-extended on Raspberry Pi
notes
Using installation instructions from Pd site:
http://puredata.info/downloads/pd-extended-0-43-3-on-raspberry-pi-raspbian-wheezy-armhf
Installation worked fine. I tried running the GUI under xterm and it was a disaster. Then, using this post, I was able to get a test patch (sine wave with LFO) running in terminal mode:
http://log.liminastudio.com/programming/running-puredata-on-the-raspberry-pi
Note: I changed the actual command to this due to the fact I’m running pd-extended and a USB sound card:
pd-extended -nogui -noadc testPatch.pd
This post from same source has instructions for installing pd-extended (disaster) but a very nice version of the test patch called testPatchExtended.pd
http://log.liminastudio.com/writing/tutorials/how-to-build-pd-extended-on-the-raspberry-pi
(another update) running Midi:
To run midi you need to specify the device on the command line. First I plugged in the m-audio key station 49 and rebooted RPi
To get a list of devices use:
pd-extended -nogui -listdev
Then to run a patch with midi
pd-extended -nogui -noadc -midiindev 1 testMidi.pd
Here is a page with more information on command line options
http://crca.ucsd.edu/~msp/Pd_documentation/x3.htm#s4
(another update) Testing with Griffin iMic. Bad news when doing an ADC->DAC passthrough, sample rates above 32000 don’t work in stereo. However 44100 and 48000 sound fine in mono.
At the higher rates in stereo, the audio breaks up. Oh well. Need to try the Behringer audio box, but I’m assuming there will be no difference. Only possibility would be to somehow devote more system resources to audio.
raspberry pi – external sound card sucess
Installed a Griffin iMic USB sound card on Raspberry Pi today.
Here’s how:
- plug in imic
- Edit alsa config file so that imic is default sound cart
- test
Details
For editing alsa, follow instructions at beginning of this post for editing /etc/modprobe.d/alsa-base.conf
But you can stop following the instructions after the first reboot.
http://www.jackenhack.com/raspberry-pi-usb-audio-quality-problems/
For testing, use this command:
sudo aplay /usr/share/sounds/alsa/Front_Center.wav
Xbee guide
A comparison of various xbee radios. You can get up to 15 miles, probably more with line of sight, but the disadvantage is that you can’t rely on outside help, like ham radio operators to help decode the telemetry signal.
From Sparkfun
Arduino INPUT_PULLUP mode
notes
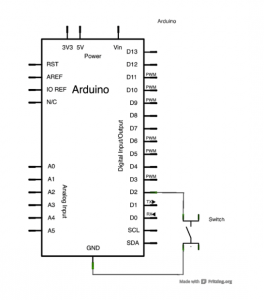
When reading the value of a switch with Arduino, its useful to set the INPUT_PULLUP mode so you don’t need to use an external pullup resistor. By the way, the internal pull-up resistor is 20K ohms.
See this tutorial:
http://arduino.cc/en/Tutorial/InputPullupSerial
If its not clear what a pull-up resistor does, read the links on this forum post.
http://arduino.cc/forum/index.php/topic,22274.0.html
Everybody has their own way to explain it. I would say that when the switch is open, the pull-up resistor weakly pulls the logic value high, so you don’t get random signal readings.


