Pluggo fx matrix

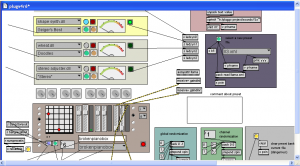
A Max 4.6 patch that uses Pluggo to create random effect matrixes with random parameters and various routing options.

plugv4r6.pat is the patch that works

User guide

(in progress)

download

– not available yet

startup

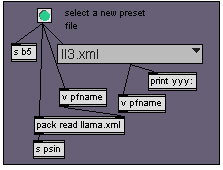
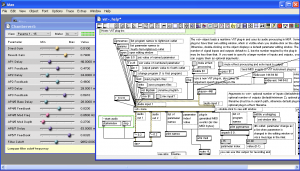
Choose a data file from the menu in this panel

The data files contain patches – not Max patches, but banks of fx patches that define a configuration of fx saved and named by the user. I haven’t figured out just what is what yet. Select a patch and press the green button. If it worked you will see the patch name change in this text box:

If it doesn’t work, the drop down menu in this box will probably read ‘nothing’

To select a patch, use the drop down menu box, or the number box to the left to make a selection. Then press the green reload button just to the left… (the purple button is for saving the current patch)

After pressing the green button – you should see the fx rack modules reloading from top to bottom – they will turn yellow when loading – and you may see the Pluggo control panel appear.

note: you may need to load a patch twice – there is a bug in the sequence of events for reloading parameters

randomization

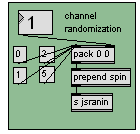
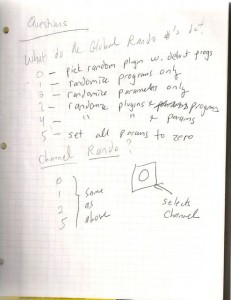
Channel randomization: There are 4 channels 0-3 which correspond to the individual fx in the rack, starting at the top. The number box selects which channel to randomize.

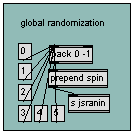
Global randomization: Randomize all channels

There are various randomization modes that you choose with the message boxes:

  • 0: randomly select a new plugin for the channel – using default preset (program)
  • 1: randomly select a new preset (program) for the current plugin
  • 2: randomly select new (reasonable) parameter settings for the current plugin
  • 3: randomize the plugin and the programs
  • 4: randomize the plugin and the parameters 
  • 5: randomize all the parameters for this plugin, reasonable or not. (this appears to not work)

Saving patch files

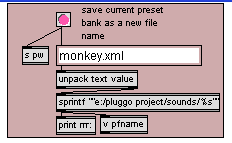
Enter the name of an xml file to save the new bank of patches to, and press the red button.

Note: the patch (xml) files are getting modified by the patch, even when they aren’t explicitly saved. Why is this?

 fx routing

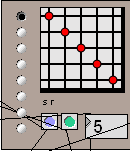
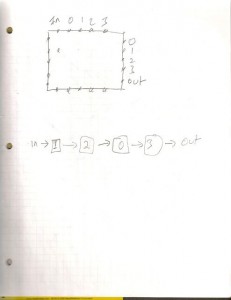
Signals can be routed through the effects matrix in a variety of ways using the matrix control object. The radio buttons on the left side of the matrix control select the most common presets

The vertical lines represent inputs in the following order:

  • signal in
  • channel 0
  • channel 1
  • channel 2
  • channel 3
The horizontal lines represent outputs in the following order:
  • channel 0
  • channel 1
  • channel 2
  • channel 3
  • signal out
A red dot at any intersection makes a connection. Here are the default routings provided by pressing the radio buttons to the left of the matrix.
serial: in -> 0 -> 1 -> 2 -> 3 -> out
reverse serial: in -> 3 -> 2 -> 1 -> 0 -> out
parallel:
in -> 0 -> out
in -> 1 -> out
in -> 2 -> out
in -> 3 -> out
serial + parallel:
in -> 0 -> 1 -> out
in -> 2 -> 3 -> out
Bypass: in -> out
zigzag serial:
in -> 1 -> 2 -> 0 –> 3 -> out
alternate zigzag serial:
in -> 2 -> 3 -> 0 -> 1 -> out
reverse serial + parallel:
in -> 1 -> 0 -> out
in -> 3 -> 2 -> out

Midi plugins and the bypass button

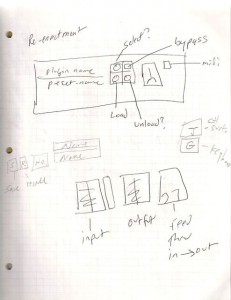
The green indicator to the right of the channel meter indicates that the plugin is a Midi device

Midi devices receive Midi input and will block audio input in a serial routing. To bypass any plugin, click the red button to the left of the channel meter:

The green button reloads the plugin with the default preset. The brown button does nothing.

Mixer and Midi input

The mixer has 3 sets of stereo controls. From left to right, they are input, wet signal, dry signal. The radio buttons to the right of the sliders allow you to select the current channel – which will bring the plugin control panel for that channel into the foreground.

The 2 drop down menus to the right  of the radio buttons select the midi input devices.

The top menu selects the midi controller device. (bcr-2000)

The bottom menu selects the midi note input and performance device.

The letter assignments can be set in the Max midi-setup configuration.

notes

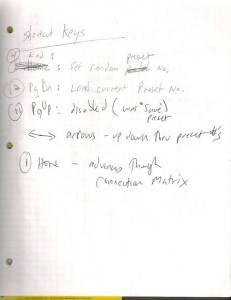
keyboard shortcuts

global randomization params

IO matrix


return of Pluggo

Pluggo, running in Max 4.6, on a Macbook, inside a VirtualBox instance of Windows XP.

to be continued…

Notes:

update 1/26/2014 – audio input and Max search path

For audio input to work in a windows XP virtual box inside of Mac OS, the sample rate of the microphone in Mac OS (utilities/audio midi setup) must be set to 441000. I spent hours trying to figure this out. Then found this post: https://forums.virtualbox.org/viewtopic.php?f=8&t=56628

The strangest thing is that if you activate audio input in Max without setting the above sample rate, you will get no audio output either.

Also, note that switching default sound cards in the host OS can cause the sample rates to reset back to 96 kHz – requiring them to be reset again before using VirtualBox.

The second issue was that the [vst~] object wasn’t finding names passed with the plug message. Turned out to be a simple matter of setting the path to the plugin directory in the Max file preferences.

Almost forgot – I set a shared drive to be on the E: drive – which was the original location of the plug go project directory – this eliminated need for updates in the patch.

The Pluggo authorization worked.

I was able to use the Behringer UCA202 (audio device) just by plugging it in. Although I couldn’t use any sound cards that required drivers.

http://www.amazon.com/Behringer-Latency-U-Control-UCA202-Interface/dp/B000J0IIEQ

Note: I am running plugv4r6 (the version from 2006)

 original post 

Instructions for installing Windows XP to run max 4.6 in VirtualBox on mac OS 10.8

  • Download and install VirtualBox
  • create new VirtualBox instance (1 Gb of memory)
  • install Windows XP from CD
  • install Firefox (or some reasonable browser)
  • install “guest additions CD image” from device menu select  (inside the virtual machine)
  • install Max 4.6 from c74

For Midi devices:

  • virtual machine – settings -usb – add the midi device – then unplug and replug – windows should find and install
  • also activated windows over internet –
  • installed and tested Pluggo
  • activated drag and drop (doesn’t seem to work)
  • setup shared folders 

Build VST plugins in Max with gen~

Today I built a VST plugin in gen~ using instructions…

at the Cycling 74 Wiki

http://cycling74.com/wiki/index.php?title=Gen_Code_Export_VST

additional things

local files:

  • max teaching examples/Tremelo-vst.maxpat (gen~)
  • max teaching examples/vst-tester.maxpat

code:

  • vstsdk2.4/public_sdk/samples/vst2.x/MyVSTPlugin
notes
  • VST requires all paramaters to go from 0-1.0 so you need to scale them in gen~
  • There are a ton of compiler warnings in Xcode. And a syntax error that you can autocorrect.
  • Restart Max, if you make changes to the plugin


Use gen~ to build iOS AU effects

Summary:

  1. In Max, write a gen~ patch and export as c++ to xcode
  2. Compile AU effect in xcode (code-signing with Audiobus API key) and launch on iPad
  3. Any app which recognizes Audiobus protocol can find and use your effect.

Details…

There are instructions at http://cycling74.com/wiki/index.php?title=Gen_Code_Export_iOS – which are expanded upon here.

Preliminaries to Preliminaries…

  1. Download the gen~ tremelo effect patch which runs ‘as is’ – and is set up to work as an AU effect with controls – from here: http://designingsound.org/2013/04/a-tremolo-au-plugin-with-max – the download button is near the end of the blog post.
  2. Download the c74 sample project  Media:iOSGenFilter.zip and copy it somewhere. This will be your project folder. It contains an xcode project file  and source code for the audiobus AU wrapper thing.
[annotations to c74 wiki notes follow:]

Preliminaries

  • Download the AudioBus SDK [1] – You will need to register as a developer. (alternatively, you can clone the github archive)
  • Download The Amazing Audio Engine SDK [2] (alternatively, you can clone the github archive)
  • Download the AudioBus iOS app in order to test [3] – It costs $4.99. Install it on your iPad or iPhone/iPod
  • Obtain a temporary Audiobus API key – You can’t do this until after you finish step 9 below.


Building an Audiobus iOS project

  1. Duplicate the provided Xcode project – (not necessary unless you want to change the project name – you already copied it into your project folder). If you want to duplicate it – check out this stackOverflow post: http://stackoverflow.com/questions/6428247/duplicating-an-xcode-4-project
  2. Copy The Amazing Audio Engine SDK to the project folder. – Here are specifics:
    1. Launch TheAmazingAudioEngine.xcodeproj
    2. In xcode, build it
    3. In ‘products’ group  in xcode navigator, <ctrl>-click on the libTheAmazingAudioEngine.a file and open in finder.
    4. Copy this file into iosGenFilter folder inside your project folder
    5. You can close the AmazingAudioEngine project in Xcode now.
    6. Now, in finder, copy the AmazingAudioEngine folder (the one that contains .h and .m files) into the iosGenFilter folder
  3. From Audiobus SDK, copy the Audiobus folder and libAudiobus.a file to the  iosGenFilter folder
  4. Open the tremelo Max patch which you downloaded.
  5. In Max, Send gen~ the exportcode message in order to export the genpatcher as C++ code – actually do this…
    1. Using inspector on the gen~ object Choose the GenFilter folder (inside iosGenFilter folder) to save the exported code to.
    2. Lock patch and click on the exportcode message box to export the code.
  6. Launch GenFilter.xcodeproj in the iosGenFilter folder.
  7. In xcode, Change the namespace used in GenFilter.mm to match that of the exported code
    1. This means, find the statement near top of file starting with “using namespace” and make it look like this: using namespace gen_exported;
    2. (if you get a bunch of errors – then you need to find out what your exported code is called. It will be the most recent .cpp file in the GenFilter folder.)
  8. Copy your Audiobus API key to the appropriate location in AppDelegate.mm – can’t do this just yet – so skip.
  9. Connect your iPad to the computer. Build the project for iPad
  10. In ‘products’ group  in xcode navigator, <ctrl>-click on the libThe GenFilter.app file and select ‘open in finder’.
    1. <ctrl>-click GenFilter.app in finder and select ‘open package contents’. – leave this finder window open
    2. in a broswer go to http://developer.audiob.us/temporary-registration – you’ll probably need to login with your user/password set up earlier.
    3. drag the info.plist file from the finder window (step A) into the dropbox in the browser.  You should get a screen with your temporary API key. I had to do this twice to get it to work.
    4. Now copy the API key into the AppDelegate.mm file replacing the one in the following statement – it was around line 50. – re-build project to make sure you have no errors
   // Create an Audiobus instance
    self.audiobusController = [[[ABAudiobusController alloc] initWithAppLaunchURL:[NSURL URLWithString:@"genfilter.audiobus://"] apiKey:@"MTM4MDY1ODQzNSoqKkdlbkZpbHRlcioqKmdlbmZpbHRlci5hdWRpb2J1czovLw==:caS8WT1r4OmYz6t89pDq37qNi29hwFba+7+7bP8WubzyKN7Xj+tnU31/Wcaw580zQg8Jz+vC6Ha0H+qDM9JhdBxfQZ7w/R0VHrvsbZYQEJkj1bNpg2h2DfsF1mvFr6jb"] autorelease];
Now do the following steps (with iPad still connected to your computer)
  1. Launch audiobus on your iPad
  2. click the run button in xcode to launch GenFilter on your iPad
  3. In audiobus, select mic input, headphone output, and GenFilter for effect.