How to add a random post button in WordPress

by teachyourselfwebsites.com

I used this method to add a “random post” to this site. I didn’t create a child theme. So it will break when the theme gets updated.

http://teachyourselfwebsites.com/create-random-post-button-wordpress-blog/

4/24/2016 note:

Here are some details. You need to create a new file inside the theme called page-random.php based on the original page.php.

the added code looks like this and goes right before get_header():


<?php
/* Template Name: Random Post */

$randomPost = get_posts(array(
 'numberposts' => 1,
 'orderby' => 'rand'
));
 
foreach ($randomPost as $post) {
 wp_redirect(get_permalink($post->ID));
 exit();
}

Raspberry-Pi RTTY beacon and streaming webcam – success

Update: 5/2014

Retrying this experiment using the Arduino circuit described here: https://reactivemusic.net/?p=12161
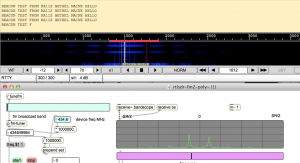
notes
  • 300 baud
  • 300 Hz carrier shift
  • 8 bits
  • 2 stop
  • no parity
  • filter at 300 Hz
  • Normal mode (not reverse)
  • AFC on
There are 2 programs:
  • serial.c – sends a beacon then transmits a 640×480 picture
  • serial-beacon.c – just sends a beacon
In order to view the picture as it comes in in dl-fldigi, you need to open up the SSDV RX window in the View menu.
The frequency is not very stable and occasionally you need to just restart dl-fldigi because the screen fills with trash characters.
Also, in Max, you need to tune on the right half of the picture.
Will be setting up a test with smaller photos


Success: Got an accurate beacon at 300 baud today and send a jpeg picture file , taken by a webcam connected to the R-Pi using fswebcam and SSDV.

http://www.slblabs.com/2012/09/26/rpi-webcam-stream/

Used the same circuit as the previous post about the Arduino RTTY beacon.

The difference is that we’re using a C program to write the text directly to the serial port which modulates the NTX2 transmit frequency.

Transmission can be stopped and started using the sleep() function but the timing is not exact.

Local code

tkzic/rpi/serial/serial1 –

  • using command line SSDV converter in tkzic/rpi/ssdv-master.
  • Using dl-fldigi to decode RTTY and SSDV pictures.
  • Using logictech c210 webcam – see link above for how to take a picture and save to file use fswebcam.


[Todo:]

  • Set up a shell script to take pictures and transmit regular intervals.
  • upload code and photos
  • Build some antennas
  • Field test
  • Buy a balloon


SSDV encoding, decoding, RTTY

I was able to packetize a jpeg file, send it using RTTY encoded audio, and decode using dl-fldigi to reconstruct the picture –  with a 33% error rate.

Details:

Encode jpeg file (note: file should be fairly small with dimensions that are multiples of 16) Using fsphil’s SSDV software:

./ssdv -e -c KA1IS -i 1 24.jpeg test1.pkt

decode:

./ssdv -d  test1.pkt test3.jpeg

RTTY:

Currently using multimode to encode and dl-fldigi to decode. dl-fldigi is the only software that internally supports the SSDV packets.

To get any results, RTTY must be at ascii, 8 bits, no parity, 2 stop bits. The other settings I will need to tweak for maximum throughput, but with this simple setup the error rate was way too high. Especially considering there was no radio involved.

Any way it sort of works


using a WiFi router as a closed local network

I set up a WiFi router today at school, with no internet connection to use for ssh logins to Raspberry Pi and OSC experiments with Arduino. It has the same SSID as my home router so it will be interesting to see what happens when I go from one place to the other. 

Update: Actually this works great. Have been using it for any situation that requires OSC.

dictionaries

notes


random word generators