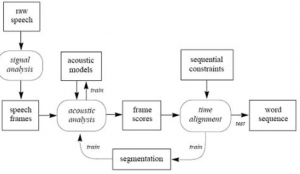
Speech recognition in Max

(update 6/2014): its easier to use the Google speech-api by calling it from curl. See recent examples at: https://reactivemusic.net/?p=4690

original post:

from Luke Hall in the c74 forum:

http://cycling74.com/forums/topic.php?id=18403

I’ve used Macspeech Dictate in this way. In fact it uses the same speech recognition engine as Dragon Naturally Speaking, it works very well but you could potentially run into the same problems as CJ described above.

Another way to achieve this on a mac is using the built in voice recognition and applescripts and extra suites, which is an applescript extension that extends the range of what you can do, including letting you send key presses.

1. Turn on “speakable items” from system preferences > speech > speech recognition.
2. Open max.
3. Open script editor and write a script like this:

tell application “MaxMSP” to activate
tell application “Extra Suites”
ES type key “1”
end tell

4. Save it in library > speech > speakable items > application speakable items > maxmsp and name the file whatever you want the voice command to be, for example “press one”
6. Now on the floating speech icon click the down arrow at the bottom and “open speech commands window”. With max as the front-most application check that the commands you just saved as applescripts have appeared in the maxmsp folder.
7. Now simply hook up a [key] object in max, press “escape” (or whichever key you have set up to turn speech recognition on) and say “press one” and you should have [key] spit out “49”!

Sorry about the length explanation I hope it makes sense to you and gives you another possible (and cheaper!) method of obtaining you goals.

Oh and the applescript extension can be downloaded from: http://www.kanzu.com/

lh
Other ideas for Arduino electric eye

notes

5/2014 – check out musical stairs project for eventual solution: https://reactivemusic.net/?p=12300

original post

Infrared reflectance sensor – no idea whether this can be focused to a beam

http://www.ebay.com/itm/Infrared-Reflectance-Sensor-Sensor-Shield-Arduino-compatible-/170842956075?pt=LH_DefaultDomain_0&hash=item27c708a12b

IR detector emitter data

http://www.me.umn.edu/courses/me2011/arduino/technotes/irbeam/irbeam.html

Tachometer circuit

http://www.pyroelectro.com/tutorials/tachometer_rpm_arduino/

Long range beam

http://pcbheaven.com/circuitpages/Long_Range_IR_Beam_Break_Detector/


Slow data

notes

Examples of slow data streams.

  • bicycle wheel sensor that triggers once per rotation
  • The data stream from an OBD-II scanner which can only be polled every 300ms or slower
  • a traffic sensor on a quiet street

There aren’t enough data points to use typically smoothing methods like moving average or logarithmic smoothing. Here are 2 ideas for increasing data points using repetition:

  • feed the data into the right inlet of an [f] object to set its value. The left inlet receives the output of a [metro] set at the desired stream rate. Then the output of the [f] object can be smoothed using conventional methods.
  • convert data to a signal using [sig~] then smooth using [slider~] or [rampsmooth~] then convert back to float using the right outlet of [number~]


Max bicycle speed / engine example patch

notes:

I’m trying to organize the examples for measuring wheel speed. These patches need to be consolidated – and have the extraneous stuff stripped out. For example, just need a wii-mote detector without all the envelope stuff.

max teaching examples/tz examples

bicycle2.maxpat – need to clean up

wheelspeed.maxpat

waveguide engine3c bike.maxpat

notes: wheelspeed2.maxpat has some experiments with smoothing by converting to signal in order to get more data points.


OBD – speeding up data requests – part 2

notes

AT commands which may help speed things up…

AT0, AT1 and AT2 [ Adaptive Timing control ]

When receiving responses from a vehicle, the ELM327 has traditionally waited the time set by the AT ST hh setting for a response. To ensure that the IC would work with a wide variety of vehicles, the default value was set to a conservative (slow) value. Although it was adjustable, many people did not have the equipment or experience to determine a better value.

The Adaptive Timing feature automatically sets the timeout value for you, to a value that is based on the actual response times that your vehicle is responding in. As conditions such as bus loading, etc. change, the algorithm learns from them, and makes appropriate adjustments. Note that it always uses your AT ST hh setting as the maximum setting, and will never choose one which is longer.

There are three adaptive timing settings that are available for use. By default, Adaptive Timing option 1 (AT1) is enabled, and is the recommended setting. AT0 is used to disable Adaptive timing (so the timeout

is always as set by AT ST), while AT2 is a more aggressive version of AT1 (the effect is more noticeable for very slow connections – you may not see much difference with faster OBD systems). The J1939 protocol does not support Adaptive Timing – it uses fixed timeouts as set in the standard.


BRD hh [ try Baud Rate Divisor hh ]

This command is used to change the RS232 baud rate divisor to the hex value provided by hh, while under computer control. It is not intended for casual experimenting – if you wish to change the baud rate from a terminal program, you should use PP 0C.

Since some interface circuits are not able to operate at high data rates, the BRD command uses a sequence of sends and receives to test the interface, with any failure resulting in a fallback to the previous baud rate. This allows several baud rates to be tested and a reliable one chosen for the communications. The entire process is described in detail in the ‘Using Higher RS232 Baud Rates’ section, on pages 59 and 60.

If successful, the actual baud rate (in kbps) will be 4000 divided by the divisor (hh).

 Repeated commands

One other feature of the ELM327 is the ability to repeat any command (AT or OBD) when only a single carriage return character is received. If you have sent a command (for example, 01 0C to obtain the rpm), you do not have to resend the entire command in order to resend it to the vehicle – simply send a carriage return character, and the ELM327 will repeat the command for you. The memory buffer only remembers the one command – there is no provision in the current ELM327 to provide storage for any more.


S0 and S1 [ printing of Spaces off or on ]

These commands control whether or not space characters are inserted in the ECU response.

The ELM327 normally reports ECU responses as a series of hex characters that are separated by space characters (to improve readability), but messages can be transferred much more quickly if every third byte (the space) is removed. While this makes the message less readable for humans, it can provide significant improvements for computer processing of the data. By default, spaces are on (S1), and space characters are inserted in every response.


Using multiple Midi channels per track with Max for Live

notes

Apparently there is a limitation on sending more than one Midi channel from a track

http://cycling74.com/forums/topic.php?id=24020

This presents an issue for receiving osc and splitting it to various instruments…

(update) What I’ve been trying to do is set up a generalized way to trigger midi from web data. Currently getting the web data via processing, sending OSC messages to max for live (or max).

Once the OSC gets to m4l, I use an m4l device in a track which receives all the osc messages then sends them off on new upd ports using [updsend] – for example a separate port for what would normally be a separate midi channel.

Then I have another m4l receiver which you can set the appropriate port number to get the channelized data stream and scale it to midi notes.

[edit – need link to sample live set]

update – the “internet sensors” project shows some easier ways to do the translation of internet API to OSC”


Pd expr~ object

Helpful for pd->max conversions.

By Graham Wakefield, at the Cycling 74 forum

Hi all,

I’ve just coded up a signal rate version of expr (in the last hour, so
consider it beta!). I’ve named it expr~ since it should be pretty much
backwards compatible with expr~ object that used to be available.

Universal Binary, no Windows version yet (I don’t have a Windows box with
VS near me):

http://www.mat.ucsb.edu/~wakefield/soft/expr~.zip

Enjoy!

Graham

Ableton – special effects, slowing down the master track

notes

Essentially the process is to copy a section of the master track into sampler, then slow it down by applying a pitch bend envelope.

I made a Live set example of this with the chorus from Justin Bieber’s “baby”

Steps: (in arrangement view)

  1. record a section of the master track into a new audio track
  2. On a midi track, select the region you are working with and make a new midi clip (shift cmd M)
  3. drag the audio from your newly created track into the instrument area for your midi track. This creates a simpler instrument
  4. right click simpler and select “simpler to sampler”
  5. Make a one note midi clip using C3 (ie, playing Midi note C3 causes the entire audio clip to play)
  6. In sampler, increase pitch bend width to maximum
  7. Apply a pitch bend envelope to the midi clip

Some miscellaneous keyboard shortcuts:

Shift tab – alternates from instrument view to clip view

shift transpose – octaves

hold down option key to duplicate clip by dragging