Karplus strong synthesis in javascript.
By Achal Dave and Grumdrig at Stack Overflow
http://stackoverflow.com/questions/13153078/web-audio-karplus-strong-string-synthesis?rq=1
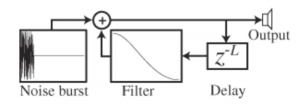
Karplus strong synthesis in javascript.
By Achal Dave and Grumdrig at Stack Overflow
http://stackoverflow.com/questions/13153078/web-audio-karplus-strong-string-synthesis?rq=1

updated 5/17/2014
This fork adds the following features to Chris Wilson’s Web Audio Playground:
Try it out at: http:zerokidz.com/wap/index.html
For optimum results try Chrome on Mac OS. But it does work in other browsers.
Patch file format is JSON. Patches are reloaded by firing gesture events which created them.
Source code: https://github.com/tkzic/WebAudio
sub-folder: osctest


Note: You can either run a local web server, using nodeserver.js and index.html – in the WebAudio folder – or use the online version of WAP as described here.
1. Load WAP in a Google Chrome browser using the following URL: http:zerokidz.com/wap/index.html
2. In WAP, load a patch called: delay-thing.
Note: If the patch doesn’t exist you can paste it in by opening the file osctest/delay-thing.json in a text editor and copying the text. Then click paste in WAP and paste in the text. Then make sure to save it in WAP by typing in the name “delay-thing” and clicking the save-as: button
3. In a terminal window, go to the osctest/ folder and start the server by typing:
ruby ./wapOSCserver.rb
4. In WAP, Press the OSC button – the ruby server should acknowledge with the message: “WebSocket connection open”
5. Open the Max patch: wapOSCtester.maxpat
6. In WAP press the play button on the Oscillator module (you should hear sounds)
7. In the Max patch drag the slider on the left to control the oscillator pitch. You should hear the sound change and see the sliders move in WAP.
The html side of the connection is done in js/socketsOSC.js
look at the function: connectOSC() – which gets triggered by the OSC button in index.html
Incoming messages from Max (via Ruby server) are parsed in parseOSCMessage() which figures out how to set appropriate values for the audio objects in the DOM.
There are currently no acknowledgement or error messages being returned (at least I don’t remember doing this)
Using internet ping data to control a synthesizer in Max
This project uses ‘ping’ times to about 40 Google domains, like google.ca, google.de, etc., to control pitch and amplitude of a 20 voice droning synthesizer.
Imagine working in a Google control center. A soothing low pitched drone fills the room. Then Suddenly you hear a slowly rising pitch. You check the monitors – Google Paraguay is experiencing network failure. You light a cigarette and wait for things to calm down.
Not using ruby to ping – due to API shutting down. The new version uses the Max [shell] external to ping from the command line.
https://github.com/tkzic/internet-sensors
folder: ping
note: Occasionally the server program will time-out when its launched. Try launching again, or edit it and increase the timeout value in [p shellping].
The server is a ruby script which handles the http: requests using the Mashape ping-uin API and sends messages to Max using OSC

The synth has a weird clustering drone like effect like some kind of alien life force.
The patch design is kind of embarrassing. Its obvious I forgot how to use [poly~]. Maybe by the time you read this, we’ll have addressed this. Hey billions of patch cords look cool.
Here’s an example of the Mashape API in curl
curl --include --request GET 'https://igor-zachetly-ping-uin.p.mashape.com/pinguin.php?address=google.ca' \
  --header 'X-Mashape-Authorization: YOUR-MASHAPE-API-KEY'
Here’s a list of Google domains
http://en.wikipedia.org/wiki/List_of_Google_domains
https://github.com/tkzic/internet-sensors
folder: ping
install the following ruby gems using: sudo xcrun gem install <gem-name>
# ./domain-ping.rb
note: Occasionally the server program will time-out when its launched. Try launching again, or edit it and increase the timeout value.
Audio samples from “Computer Music” and “Future Music”
http://www.musicradar.com/news/tech/sampleradar-13154-free-sample-downloads-217833/1

A variation on the Midi synthesizer from this post: https://reactivemusic.net/?p=4960
The synthesizer was built in PureData (Pd extended) using the visual interface on a MacBook. Then the pd file was run in command line mode on the r-pi. The sound card is a Griffin i-Mic, running at 22.5 Khz sample rate. Although there’s no reason why you couldn’t use the builtin DAC on the r-pi.
The r-pi is connected via the ethernet port to a wi-fi network which receives Osc (Open Sound Control) messages from an iPod running touch-Osc. The network connection could have been made using a USB wifi adapter.
All together the cost of this arrangement (less the iPod) would be less than $50. The software is all open source. The huge financial barriers to working with music synthesis and signal processing, that have been associated with these fields for years, simply don’t exist anymore.
Alternative ways of controlling the synth – if a wiFi router is not available, include:

Notes:
Pd file: tkzic/rpi/pd/piSynth1_OSC.pd
recieve port is 8000 – and it uses page 1 of the simple touchOSC template
pd-extended -nogui -noadc piSynth1_Osc.pd
Note: there is some special code to prevent seg faults when you go from page 2 to page 1 of the touchOSC template
Here’s a great tutorial on using OSC with Pure Data
http://en.flossmanuals.net/pure-data/network-data/osc/
Transmitting on 434.650 MHz.
Successfully ran the configuration described in this article
By Anthony Stirk at UKHAS
http://ukhas.org.uk/guides:linkingarduinotontx2
Have only tried 50 baud – but the beacon ran for over an hour without errors. The receiving setup was done on a Windows 7 computer:
The bandwidth of the RTTY signal was close to 900 instead of something more reasonable like 50. This can be adjusted by trying various resistor values in the voltage divider circuit.
Next steps include building antennas and increasing the baud rate.
Here’s a simple FM Midi synthesizer developed in pd running on a Raspberry Pi. The patch was written and tested on a Macbook, then the patch file is uploaded to RPi and run using pd-extended from the command line. For example the command to run this patch is:
pd-extended -nogui -noadc -midiindev 1 piSynth1.pd
[todo: upload patch to this site. Currently in tkzic/rpi/pd/piSynth1.pd]
[udpate]: when trying this again, a few problems came up:
A collection of Pd synth patches that might run on Raspberry Pi.
(7/2014 The formatting is not working with this example)