How to separate the status return code from the actual response data?
For jit.uldl- status reports get sent out the right outlet and errors are reported in the Max window. However their doesn’t appear to be a way to get the http: status codes or other header data.
For curl, you can write the response (JSON for example) to a file. Then you can read the file using the [js] object and parse the JSON. If you are using [aka.shell] to run the curl command, the stdout and stderr can be routed from the object – for instance, into the Max window. The -v flag (verbose mode) causes curl to output a bunch of header data.
Much of our driving experience is wrapped up in sounds that happen when you press the pedal to the metal. Like Superman emerging from a phone booth, this 2006 Jetta seems different. The project connects RPM data from an OBD2 diagnostic sensor with the input of the car radio. Via synthesizers.
This project uses the RPM data from an automobile OBD-II port to control the engine speed of an engine simulation from Andy Farnell’s book “Designing Sound”
Here’s the patch that polls and translates OBD-II data
patch is tkzic/automax/rpm4.maxpat
Here’s a Max version of the Farnell car engine simulation:
patch is tkzic/automax/waveguide_engine2e-1.maxpat
Use a real Wii remote, not the Nyko. If you do get the Nyko, get the one with motion-plus.
update Osculator to the latest version
Under parameters (in osculator) press + to add the little pacman symbol labeled “same address”, and set the the OSC URL to whatever you’ll be using like 9000 for Max
remember to add the Event type (OSC routing) and value (pacman thing) for every wiimote event you’ll be using
remember to enter checkbox on the wiimote window for every type of data you want to send
I would like to update all of this in node for max – but its also nice to have an example of doing OSC communication with Max the old way.
Original documentation follows
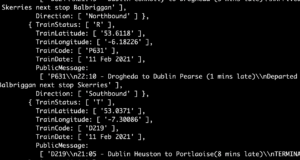
This map is centered on Dublin. Each train is a different color and the train number gets printed next to the current position. So for example you can see P607 coming into Dublin from the South.
It gets updates every 10 seconds or so – but sometimes the trains seem to ‘jump’ so I don’t think the actual data itself gets updated that fast.
Install node.js on your computer (or a separate server). Instructions here: http://nodejs.org
In a terminal window go to the project folder ie., /internetsensors/trains
type: npm init
(just accept all the default values)
The following node packages are required. Install using npm. For example:
type: npm install request
Do the same with all these packages
request
xml2js
util
http
ws
instructions
These instructions are a bit confusing. A simpler UI is in the works. (that’s funny – I said it 8 years ago)
Open both Max patches: max-train3 and train-drawing4
To run the server, open a terminal window, go to trains folder, and type:
node ./max-train1.js
Back in Max, in train-drawing4, you can start and stop polling with the toggle button in the upper left corner. If you want to toggle playback from the data recorder, you’ll need to have some data recorded – or load a file (this is done from max-train3)
In max-train3, select a preset in the preset object. Try the top left one, The presets go from low res to high res on Dublin (left to right).
You can load train-data1.txt by clicking read message on the data recorder. Then press play, or use metro (set to low number) for high speed.
In train-drawing4 you’ll need to manually clear the lcd and lcdsprites in the drawing section.
In max-train3 you can clear the color database using labeled button (if the train names don’t print on the map)
Running the chat thing
When you connect to the node server in a web browser, for example using the following url:
http://localhost:8124
You will get a message welcoming you and asking you to enter your name. After you enter your name, Max will send you a response. Then you can enter map points using the following format:
Dublin 53.15 -6.90
The map point will be drawn on the map in the Max patch.
how does it work?
Data communication is done with OSC messages. Here’s how
Max sends a /getTrains message to a node.js server
The server runs an http: request to the Irish rail API
The server parses the response data and sends back a bunch of /train name x y messages. to Max
You can also connect to the node server from web browsers in kind of a ‘chat’ thing (using Web sockets) and enter geographical place names with lat/lon – which get pinned to the map – and Max sends back personalized thank-you notes.
Note: if there’s no data at this link, check the time of day. Trains stop running around midnight UTC.
Programming:
Essentially what this program does is collect current train position data from Ireland and display it as points on an XY grid.
components:
Max/MSP
node.js
Web browser
Irish train API
Server
The server is written in node.js. This was my first real project using node. So I tried to make it do a bunch of things, just to test them out.The necessary features are
web server to make http: requests to get the train data
UDP server to pass data and messages back and forth from Max to node.js using Osc
convert XML train data to JSON,
convert point data from lat/lon to XY format
Additional features of the server include:
chat server using socket.io which allows several web browser sessions to connect to the server, talk with each other, send point data to Max, and receive acknowledgement from Max
Localhost vs. separate server
This is probably the most confusing part about this program. You can run it on the Mac in localhost mode, or you can run the node.js program on a separate server, as long as there is a direct ip path back to the computer where Max is running. Running a separate server makes more sense if you are using the chat or a remote web control aspect of this. I have run the node program on a Ubuntu server on my local network without making any changes other than to the IP addresses as explained next.
You need to make 2 changes to go from localhost mode, to separate server mode:
In the client program, max.html – near the top, change the ip address from localhost to the specific ip like this:
// note: if you want to run this program on something other than localhost, then put in the ip
// address of the server here, instead of local host...

//     var socket = io.connect('http://localhost:8124');
//
       var socket = io.connect(192.168.1.10:8124');
In the server program, max-train1.js – change the destination address for UDP to the address of the computer where max is running:
var dSendAddress = '127.0.0.1';	// send response messages to max at this address
// do this if max is running somewhere other than the same computer as the node server
// var dSendAddress = '192.168.1.104';	// send response messages to max at this address
Also in the Max patch max-train3.maxpat you will need to change the [udpsend] object to give it the host address of the node server.
screenshots:
max-train3.maxpat
train-drawing4.maxpat
Data recorder:
To be able to save and replay data I included a data recorder in the patch. Its a revision of the data recorder from CNMAT by Michael Z. This version
works with lists that start with a symbol (not just ones that start with numbers)
handles the time delta correctly on the first record
adds additional transport controls, for example playback using a [metro] at any speed – and ability to goto a particular position in the data file
The actual code for the patch is horrendous. Its filled with debugging objects and is a maze of patch cords lacking explanation. But it works…
what’s next
Make sure that the Max Patch loads a preset map setting by default
put a timestamp message in the node console and Max console so we know at the end of a train list what the current time is.
clean up instructions
make a screencast do demonstrate how to use this needlessly complicated patch.
Note: To get this project to work you’ll need a Twitter account. And you’ll need to set up a device (feed) at xively.com and a ‘zap’ at zapier.com as directed in this post. It explains how to send tweets using triggers.
[aka.shell] download from here: http://www.iamas.ac.jp/~aka/max/ – and add the path to the folder to Options | File Preferences in Max
authorization
xively.com feed id and api-key is embedded in max patch
you need a Twitter account
you need to set up a xively.com feed with twitter trigger, (as described here https://reactivemusic.net/?p=6903) to get your own feed id, API-key, and authorize access to your Twitter account
instructions
Open the Max patch: tweetcurl5a.maxpat
enter your xively feed number and API-key into the fields (then press enter)
Type your Tweet text.
Press the big green button.
notes on curl
You can use curl for http: requests in Max by formatting the command line with [sprintf] and running it in [aka.shell]. There are a few idiosyncrasies – for example with escape sequences.
In tweetCurl5a.maxpat, the curl command is built in two sections:
The request data is written to a data file /tmp/abc.json
the actual curl command is formatted and run from the command line.
Here is the part of the patch which formats request data:
Using ‘quotes’ with [sprintf]
You’ll notice a lot of backslashes used in [sprintf]. This is done to preserve quotes. Normally a quote in [sprintf] indicates a string. Use 3 backslashes to escape a quote:
\\\"
Passing arguments into [sprintf]
The [sprintf] code is obtuse because we are formatting JSON data. The resulting data looks like this:
{ "id":95586, "datastreams":[{ "current_value":"this is a tweet", "id": "tweet"}]}
Note that you can pass arguments into [sprintf] using %s – but if you are using a [textedit] to collect data from the user, you’ll need to use [tosymbol] to consolidate the text into a single symbol before passing into [sprintf]
Here’s the code which writes the formatted JSON data to a file:
The next step is to format the curl command, which will read the JSON data file and send an http: request to cosm.com. Here you can see the [sprintf] for this command.
Redirecting aka.shell output to the Max window
At the very end of the [sprintf] you will see
>2&1
This is the linux method to redirect error messages and standard output from [aka.shell] to the same place, which in this case will be the Max window.
command line curl
By the way, here is what the curl command will look like on the command line