Black on white with Max 7

Making Max 7 look like 6.
What’s this about?

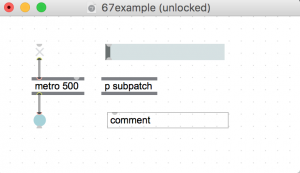
The UI in Max 7 reverses foreground and background from previous versions of Max (and Pd).  Additionally,  a secondary toolbar menu frames the patcher and all sub-patchers. For example, here is a simple Max 6 patch and its Max 7 equivalent.

Max 6:
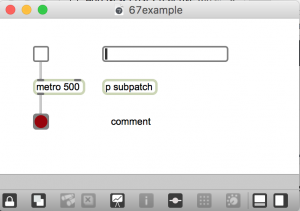
Max 7:
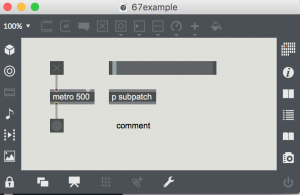
Regardless of which look you find more appealing, the new UI is problematic in several ways.

  • Light text on dark background can be difficult (blurry)  for people with vision impairment – given the same font size and screen brightness.
  • Patches created in previous versions of Max lose their original design.
  • Larger objects and toolbar frames consume more screen space.
  • If you like to sketch ideas with pencil – an empty white patcher screen is like paper.

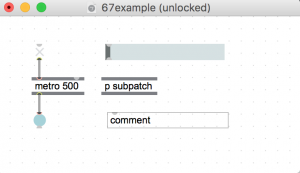
Max 7 doesn’t include a black-on-white style, but you can make your own. And lose the toolbar. Here is a new and improved version of the patch:
Making a new style

The process is arcane. But it took less than a half hour to get results. Then I wasted time endlessly tweaking.

The secret recipe came from a 2014 Cycling 74 forum post by Phiol, with assistance from Ben Bracken. Everything you need to know is explained in Phiol’s first 2 posts in the thread. https://cycling74.com/forums/topic/custom-color-scheme-layout-setup-walkthrough/#.V6oHMZMrIcg

I encourage you to read both posts and follow the steps precisely. There are no shortcuts. I will paraphrase Phiol’s method here:

  1. In a default patcher, make a bunch of objects and then in the Format Palette (object inspector) change them to whatever colors you want
  2. Select all the objects in the patcher
  3. In the Format palette, make a new style – this style will be for multiple objects
  4. Select the patcher to activate it in the Format palette
  5. In the Style menu (located in the patcher inspector window), select the style you just made, applying it to the patcher level
  6. Delete all of the objects in the patcher
  7. Save a new template (in dropdown file menu “create template”) and make it your default.

And then the bad news:

Step 1. is important.
  • You must start from a blank “Default Patcher Template” and choose “Default Max7”
  • You cannot copy/paste objects that you had already done your custom colors. You will have to start from scratch. one by one.
  • In the inspector window, make sure the “Appearance style” has nothing selected in it’s umenu

Then do all the steps mentioned in the previous thread.

The Glitch/bug:

-Gradients objects do not work.
For example, [message and umenu] would not keep my custom colors.

Workaround: Once you have started a new patch, reselect your “custom_style” in patch inspector window or the ‘format’ sub menu. That is, click the style that should already be selected/checked – and now it should work.

So yes, for now, as we start a new patch we will we have to make it a habit to always select our “custom_style” in patcher inspector window or the format sub-menu.

patcher inspector window

format submenu

(click the paintbucket icon on the top toolbar)
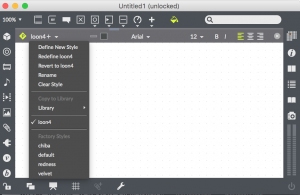
 

Copy style to library

Also, when you open older Max6 patches and/or the help patch and want to apply your new custom style template, make sure that in the “Format” dropdown menu you have selected the “copy style to library”.

Loading Max 6 patches

Once you’ve done this, you will be able to apply you’re custom style to older/help patchers and resave them with your custom look. To do so, you open Inpector’s Appearance again, and select your “custom_style” that will be in the Library style.

Walking through the process of step one

If you are totally confused at this point, so was I.

Starting with step one above,  make a patch with common objects, that looks something like this:
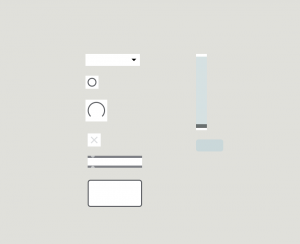
Select each object individually, then with inspector, change the background color to white, or a lighter shade, and the text color to black.

You may need to experiment. Try with a small number of objects at first – because you will probably need to do the whole process several times. As noted above, you have start from the begining  each time by hand. You can’t modify a style after you save it.

Then, you should be able to follow the rest of the steps from Phiol’s post.

The objects used for this style are:

  • umenu*
  • button
  • dial
  • toggle
  • generic object
  • textedit
  • slider
  • message*

*these objects use gradients

Making a white patcher background

  • open a blank patcher
  • ctrl click on the background and select “Inspector Window”.
  • Change the unlocked and locked background colors to white.
  • Then, from the File menu, select ‘create template’ and give it the same name as the template you selected in step 7 above (and make sure to check ‘default for new patchers’)

Getting rid of the tool bar frame

The procedure is basically the same as setting the white background.

  • In a blankpatcher, open the inspector window and uncheck ‘show toolbar on open’.
  •  Then, from the File menu, select ‘create template’ and give it the same name as the template you selected in step 7 above (and make sure to check ‘default for new patchers’)

Note: you can toggle the toolbar anytime with <cmd>8

 If subpatchers  still have the default look

If you create a subpatch and it reverts back to the default style then…

  • In a blank patcher, open the inspector window and set the subpatcher template to your new tempate created in step 7 above.
  •  Then, from the File menu, select ‘create template’ and give it the same name as the template you selected in step 7 above (and make sure to check ‘default for new patchers’)

More about styles and templates in Max 7

Check out the Cycling 74 vignettes about styles and templates to get a better understanding of what’s going on here:

https://docs.cycling74.com/max7/vignettes/styles

https://docs.cycling74.com/max7/vignettes/templates

Virtual serial ports in Windows

Using Virtual Serial Port Manager

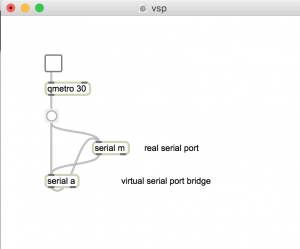
Setting a local bridge to connect the 2 virtual serial ports allows a Max patch to communicate with a radio on a real serial port and pass through the data to a virtual serial port that can be used by another program, such as a logger. The patch looks like this:

Screen Shot 2016-04-07 at 10.09.47 PM


Its looks like a feedback loop but its not. In this case the bridge is: com1 <-> com2. Com1 is port a in the above patch. Data sent to com1 can be read from com2 and vice versa.


SQLite database for remote radio in Max

under construction…

Max/MSP features a full implementation of SQLite using the js (javascript) object. Here we describe a database to track radio frequencies. Frequencies are stored by time, type, and mode. The frequencies can be retrieved in various ways, like with a scanner radio.

Tables can be created and maintained outside of Max using the command line (sqlite3) or database apps like SQLiteStudio.

Max patches:

(not yet available on github:

  • freqdb4.maxpat (database UI)
  • swBase3.js (SQLite code)
  • lp_radio2.maxpate (Launchpad)

DB structure:

The database is called newtestDB1

tables:

You can see the table schema in the screenshots. The tables were created using command line sqlite3 and SQLiteStudio.

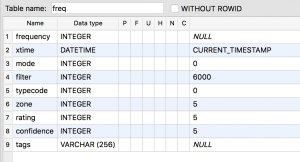
freq table:

One record for each stored frequency. This table retains its state from each previous use, but new records can be added using the Max patch, or the Launchpad.

Screen Shot 2016-04-05 at 11.00.31 PM

xtime: Timestamp in UTC.

frequency: Hz.
mode:

  • usb: 0
  • lsb 1
  • cw 2
  • am 3
  • fm 4

filter: bandpass filter setting in Hz. (default is 6000)

typecodes:

0 : unknown
1 : AM/SW broadcast
2 : clock
3 : digital mode
4 : local broadcast
5 : mostly noise

zone: cq zone number

rating: 0-5 (0 = unrated)

confidence: 0-5 (0 = unknown)

tags: (general text notes)

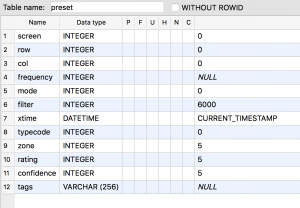
preset table:

The preset table contains one record for each 8×8 launchpad button, for each of 3 screens.

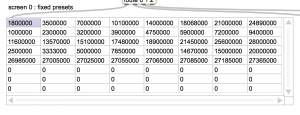
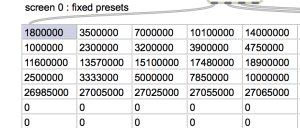
  • screen 0: fixed presets (red) (static and persistent)
  • screen 1: time presets (green) (rebuilt with each time query)
  • screen 2: user presets (yellow) (persistent but can be modified using the Launchpad)

Data from each of theses screens is also displayed in jit.cellblock objects in the Max patch. All of the fields correspond to the fields in the freq table – except for screen, row, and col which are locators for the launchpad.

Screen Shot 2016-04-05 at 11.11.08 PM

Using the database

Launchpad presets

There are three screens of presets color coded using the Launchpad mixer button (upper right). Press it to cycle through the 3 screens.

0 fixed presets (red)

The fixed presets are static. But can be changed using SQLiteStudio. They contain commonly used radio frequencies, like the SW, Ham, and CB bands. And clock stations.

To select a preset, press its button on the Launchpad.

Currently assigned presets:

Screen Shot 2016-04-05 at 11.39.12 PM

1 Time Presets (green)

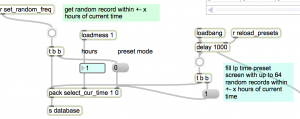
Time presets are frequencies with Timestamps that match a selected range. For example, every frequency within one hour of the current time. These can be selected with a query in the Max patch, or using default values from the Launchpad. The query will randomly match up to 64 records. If the query returns less than 64 records, you will get all matching records, but in random order.

From the Max patch:

Match hours plus/minus current time (0-12).

Type the number of hours in the number box and press the button under the delay object. This reloads the presets.

Screen Shot 2016-04-05 at 11.36.35 PM

You can view the results in the jit.cellblock:

Screen Shot 2016-04-05 at 11.39.07 PM


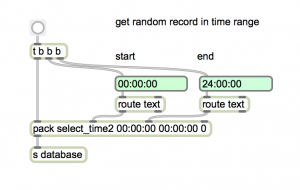
Match a specific time range:

Enter the start/end times and press the button.

Screen Shot 2016-04-05 at 11.40.51 PM


Selecting from launchpad

trk button: re-runs query using last set number of hours plus/minus current time. Default is one.

solo button: select one random preset using current hour range, and play it?


User Presets (yellow)

The user presets work like the pushbuttons on a car radio. Press to select. Hold to save the currently tuned radio frequency.

The learn button (upper left) gives feedback. If you press a pad for which no frequency has been assigned, the learn button will flash red. When you save a new preset, the learn button flashes green to indicated that the saving is done. If you press a pad for a preset that has already been saved, there will be no flash, but the radio frequency will change.

Adding new frequency records

You can add records using the Max patch or the Launchpad, or from SQLiteStudio.

Adding records from Max:

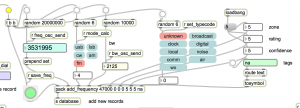
Tunning the radio fills in all of the fields except for typecode. Tune the radio. Then press one of the typecode buttons. Then press the big green button. You have added a new record.

Screen Shot 2016-04-05 at 11.55.57 PM


Adding records with Launchpad:

Press the Arm button (lower right) to add a record for the currently tuned frequency, using an ‘unknown typecode’

Adding records from SQLiteStudio

Just do it.

Griffin Powermate as Midi controller

Solves focus problem.

thumb_griffin-powermate_sq

By Johannes Hoffman

http://www.net-artworks.de/articles/en/Powermate.php

I used this method as an alternative frequency controller for the remote radio project. It uses Applescript and Midi-pipe http://www.subtlesoft.square7.net/MidiPipe.html

The left and right encoder values are assigned to MIDI control messages.

update 2022/10/18

Implemented on Mac OS Monterrey (M1)

Downloaded most recent drivers from https://app.box.com/s/m9rrdlqdnoh8uf3utxdaswvep4cgogek

Implemented Applescript/Midipipe as described above. Had to make a few mods to get both CCW and CW motion working and change name of IAC driver in Midipipe script.

Local scripts in tkzic/griffin powermate scripts/

Applescripts entered using applescript editor app. Links to the applescripts should be entered in the powermate.app which sometimes only appears visible in the top bar after a reboot.

To start:

  • run powermate.app (if not automatically started on login)
  • run powermate2midi.mipi (this is midipipe)
  • you should be able to read cc messages now from iac driver 1
  • example max program: max teaching examples/griffin powermate test.maxpat


Remote radio – client

How to set up the client side of the remote radio system.

(under construction) patches have not been uploaded to github

This client works with the sever described in the previous post. We are running a MacBook Pro OSx 10.11.4. with the following:

  • logmein hamachi VPN
  • Soundjack VOIP
  • Max/MSP
  • Novation launchpad
  • DJ-Tech CDJ-101 controller

VPN

Install and set up LogMein Hamachi. It is free, for a limited number of computers.  Set up a Hamachi server on both the server and client. It should look something like this:


VOIP

We are using Soundjack VOIP. It is also free. Use the following parameters on the client side.

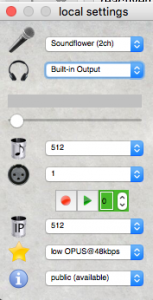
  • mic: soundflower 2ch (or something that is not currently producing input!)
  • headphone: default output (or whatever you want to listen on)

Screen Shot 2016-04-05 at 12.23.54 AM

You can ignore the rest of the settings, since we are not sending audio. Most of the configuration is done on the server side.

Max

We are using several patches, depending on which hardware controllers you are using. Make sure that the hardware controllers are connected before opening Max.

patches:
  • eagle-ui5.maxpat – User interface and main entry point for client communication and CDJ-101 abstrations

Screen Shot 2016-04-05 at 12.28.56 AM

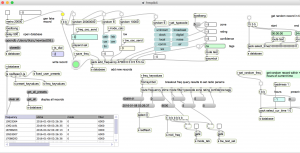
  • freqdb4.maxpat – database handler

Screen Shot 2016-04-05 at 12.29.17 AM

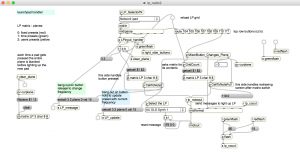
  • lp_radio2.maxpat – launchpad driver

Screen Shot 2016-04-05 at 12.28.41 AM

After the max patches are loaded, you should be able to control the radio using the UI and the CDJ-101 controller. The red Mixer button in the upper right corner of the Launchpad should be lit.

Instructions:

to be continued…

Remote radio – server

How to run the server side (base station) of the remote shortwave radio system.

(Under construction) The patches have not been uploaded to github yet.

Assuming that the radio and antenna system are operating. We are using an internet connected MacBook Pro running OSx 10.9.5, with a MOTU 828 MK3 audio interface.

VPN

Install and set up LogMein Hamachi. It is free, for a limited number of computers.  Set up a Hamachi server on both the server and client. It should look something like this:


VOIP

We are using Soundjack VOIP. It is also free. Use the following parameters on the server side.

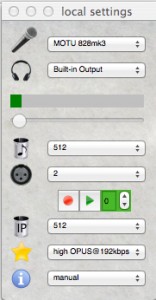
Local Settings:
  • mic: audio interface channel that is connected to radio audio output
  • headphone: doesn’t matter
  • volume: 0
  • audio block samples: 512
  • channels: 2
  • network packet samples 512
  • quality: high
  • userlist: manual

Screen Shot 2016-04-05 at 12.38.03 AM

User list:

UDP/IP: enter hamachi IP of client.

When Soundjack is set up on the client. Press the green start button on the right side of the user list window on the server.

If all goes well, you should hear the radio on the client. Note: The input meter under local settings should be registering audio from your radio. If not, there is a problem with the audio interface.

Max Server

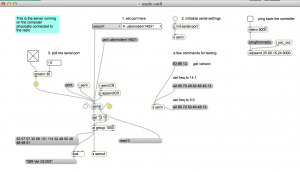
The Max/MSP server exchanges CAT commands via the server serial port to the radio. The command data is exchanged with a Max patch on the client using OSC (over UDP).

Screen Shot 2016-04-05 at 12.46.02 AM

patch:

eagle-cat8.maxpat

instructions:
  • select the radio serial port from the menu (for example: usbmodem 14531)
  • initialize port settings
  • set toggle to poll the serial port

At this point you should be able to try the example commands, for instance to get the version or set frequency. If the commands are not working, it indicates a problem with the serial connection to the radio.

Next, check the IP address of the udpsend object. It should be the hamachi IP of the client.


Remote controlled shortwave radio system

Under construction…

The first in a series describing a system for internet remote control of a shortwave radio station. Its not something new. There are commercial products that provide remote operation of amateur radio transceivers. The purpose of this project is to make it possible to use shortwave radio sounds in musical performance, without the need of an antenna system.

Features:

  • Max/MSP for USB serial control of radio, OSC remote interface, user interface, Midi device handling, and an SQLITE database of preset frequencies.
  • Low latency, good quality audio using Soundjack by Alex Carot.
  • Hardware control of radio using Midi controllers (CDJ-101 and Launchpad)
  • Bi-directional OSC and VOIP using Logmein Hamachi VPN
  • Additional hardware control of AC power and antenna selection using Arduino and a WeMo switch.
  • TouchOSC Ipad audio mixer control using MOTU Cuemix
  • TeamViewer remote desktop software for logging into to base station compuer
  • Optional radio user interface control with Ipod TouchOSC, Griffin Powermate dial, and Korg Nano-kontrol.
  • Optional VOIP backup using Mumble.

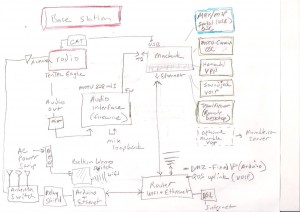
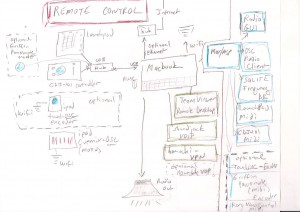
System diagram

base station:

remote-radio-sys1

remote control:

remote-radio-sys2


Internet shortwave radio using Max, Hamachi, and Mumble

How to control an amateur radio transceiver over the internet, using Osc (Open Sound Control), VOIP (Voice over Internet Protocol) and VPN (Virtual Private Networks).

What problem does this solve?

Using a shortwave radio receiver in a  live performance without installing a large antenna system.

This method gives low-latency real-time access to audio, and radio control using a laptop computer from anywhere. I suppose it could also remote-control a synthesizer, if you’re into that kind of thing.

CAT

Modern ham radio receivers can be controlled using serial commands using the CAT (Computer Aided Transceiver) protocol. Usually this is done via a USB port. There are hardware solutions for remote controlling radios over the internet, like RemoteRig http://www.remoterig.com/wp/. But there is also a free, or low cost, solution using software.

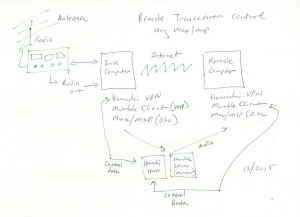
System diagram

Screen Shot 2015-12-21 at 1.23.10 AM

The ‘base’ computer is connected to the radio/antenna. The ‘remote’ computer is a laptop that could be anywhere connected by WiFi

For this experiment we used a TenTec Eagle transceiver connected to a MacBook USB port. The audio output of the radio connects to the audio input of the MacBook. The MacBook is directly connected to an internet WiFi router using an ethernet cable.

VOIP

A mumble client runs on the base computer, https://en.wikipedia.org/wiki/Mumble_(software)  and also on the remote laptop. Both clients are connected to a Mumble server (Murmur) at Mumble.com http://www.mumble.com/mumble-download.php. You could also run your own server. I set the audio to the best quality and muted the microphone on the remote laptop. We are only using the laptop as a receiver. For transmitting, you could simply open up another channel on the Murmur server. Mumble has very low latency (compared to Skype) and decent audio quality.

Bi-directional commands using VPN and OSC

CAT commands go in both directions – to and from the radio. For example, you would send a command to the radio to change frequency. The radio would send acknowledgements back to the remote laptop.

This is a problem for networks that use NAT (Network Address Translation) because local IP addresses are private, hidden behind routers. The solution that eventually worked was using a VPN called Hamachi https://secure.logmein.com/products/hamachi/download.aspx on both the remote and base computers. Hamachi servers are setup on both computers and connected to each other. This allows the computers to ‘see’ each other as if they were on a local network.

Max and Osc

Max patches are run on both the base and remote computers. The Max patch on the base computer connects to the radio using the serial object and passes commands back and forth over the internet using udpsend and udpreceive (which use Osc).

The Max patch on the remote MacBook sends and receives commands from the base computer using updsend and udpreceive. With the Hamachi VPN, Osc works just like it does on a LAN (local area network).

Automatic reconfiguration of clients

The main advantage of this system is that when you move the remote MacBook to a new location – for example, a coffee shop with public Wifi – both the Mumble and Hamachi clients automatically reconfigure for the location. So you don’t need to know the actual IP address of your computer in the coffee shop. The reconfiguration usually happens within seconds after the Wifi connection is made.

Alternatives

If you are just working across a LAN, you don’t need a VPN. Osc will run on a local network using private IP’s.

You could also try Ross Bencina’s Oscgroups http://www.rossbencina.com/code/oscgroups. Although I was not able to get Oscgroups to work, other than in a LAN.

For uni-directional Osc communication from remote to base, in a WAN (wide area network) you can use a static IP address for the target.

Skype is another (free) solution for transmitting VOIP audio. Set the base computer in auto-answer mode and call it from the remote computer. Skype will process the audio more than mumble, with noise gates and such. And the latency is higher. But its very easy to set up.

Development

The next step is to build a remote interface for the radio that uses Midi/Osc controllers, so for example you can turn a dial on the Midi controller to change frequency or filter settings on a base radio.

to be continued…

ep-341 Max/MSP – Spring 2015 week 14

(under construction)

Algorithmic composition and generative music – part 3

Sensors, sonification, and data.

Sensors

Data

Vine API in Max

A Max patch that displays, transforms, and responds to internet data.

building materials
  • Max (6.1.7 or newer)
  • Soundflower –

Both available from Cycling 74 http://cycling74.com/

The Max patch is based on a tutorial by dude837 called “Automatic Silly Video Generator”

download

The patch at the download link in the video is broken – but the javascript code for the Max js object is intact.

Download the entire patch from the Max-projects archive: https://github.com/tkzic/max-projects folder: maxvine

Internet API’s

API’s (application programming interfaces) provide methods for programs (other than web browsers) to access Internet data. Any app that access data from the web uses an API.

Here is a link to information about the Vine API: https://github.com/starlock/vino/wiki/API-Reference

For example, if you copy this URL into a web browser address bar, it will return a block of data in JSON format about the most popular videos on Vine: https://api.vineapp.com/timelines/popular

HTTP requests

An HTTP request transfers data to or from a server. A web browser handles HTTP requests in the background. You can also write programs that make HTTP requests. A  program called “curl” runs http requests from the terminal command line. Here are examples: https://reactivemusic.net/?p=5916

Response data

Data is usually returned in one of 3 formats:

  • JSON
  • XML
  • HTML

JSON is the preferred method because its easy to access the data structure.

Max HTTP requests

There are several ways to make HTTP requests in Max, but the best method is the js object: Here is the code that runs the GET request for the Vine API:

function get(url)
{
    var ajaxreq = new XMLHttpRequest();
    ajaxreq.open("GET", url);
    ajaxreq.onreadystatechange = readystatechange;
    ajaxreq.send();
}

function readystatechange()
{
    var rawtext = this._getResponseKey("body");
    var body = JSON.parse(rawtext);
    outlet(0, body.data.records[0].videoUrl);
}


The function: get() formats and sends an HTTP request using the URL passed in with the get message from Max. When the data is returned to Max, the readystatechange() function parses it and sends the URL of the most popular Vine video out the left outlet of the js object.

Playing Internet audio/video files in Max

The qt.movie object will play videos, with the URL passed in by the read message.

Unfortunately, qt.movie sends its audio to the system, not to Max. You can use Soundflower, or a virtual audio routing app, to get the audio back into Max.

MBTA API
Audio from video

https://reactivemusic.net/?p=12570

Video from audio

https://reactivemusic.net/?p=12570

Sonification of Vine videos

https://github.com/tkzic/max-projects/tree/master/maxvine

patch: maxvine-analyzer.maxpat (requires other files in the maxvine folder)

Steve Hensley example: local file: shensely_maxvine.maxpat

References

There is a large archive of examples here: Internet sensors: https://reactivemusic.net/?p=5859

Aggregators

There are API services that consolidate many API’s into one API. For example:

Scaling data

Look at the Max tutorial (built in to Max Help) called “Data : data scaling” It contains most of what you need to know to work with streams of data.

Curl examples: https://reactivemusic.net/?p=5916

Assignment

Algorithmic/generative music. Due in class next week.